Working with puzzle design through state space visualization
In the beginning of 2014 I was interested in procedurally generating computer games puzzles with typical elements like toggles, gates that can be triggered to open, boxes or boulders that can be moved onto pressure plates, etc. Many games contain elements like these and I took inspiration in particular from the game Lara Croft and the Guardian of Light.
To better understand these puzzles, and understand what makes a puzzle interesting or boring, I started creating a tool for analyzing and visualizing the state space of the puzzle. In the Procedural Content Generation mailing list I discussed the approach here.I've worked on it on and off since, and while I still don't have an algorithm for procedurally generating the puzzles, the tool itself is interesting in its own right. It's called PuzzleGraph and I've just released it for free.

You can setup and connect puzzle elements like gates, toggles, pressure plates and boulders, and see the state space of the puzzle visualized, including solution paths, dead ends and fail states.
If you make some puzzles with PuzzleGraph, I'd love to see them!
The best demonstration is this video I made. If you already saw the video, skip down a bit for some new info and announcements.
A Study in Composition
Two weeks ago I participated in Exile Game Jam - a cosy jam located remotely an hour's drive outside of Copenhagen. There was a suggested theme of "non-game" this year.
This was partially overlapping with the online Procedural Generation Jam (#procjam) which ran throughout last week with the simple theme of "Make something that makes something".
I wanted to make a combined entry for both jams. My idea was to create procedural landscapes with a focus on evoking a wide variety of moods with simple means. I formed a team with Morten Nobel-Jørgensen and got an offer to help with soundscapes from Andreas Frostholm, and we got to work.
You can download the final result here: A Study in Composition at itch.io. You can also watch a video of it here:
Furthermore we decided to make the source code open source under the MIT license. You can see and download the Unity project folder at GitHub.
Motivation
The motivation of the project was primarily to learn about how to create evocative and striking landscapes with simple means, particularly by creating harmonic and expressive color palettes. The name "A Study in Composition" is meant to convey this in a similar sense as it's used in classical art.

Making the demo
Each scene consists of just a flat plane and a distribution of trees, all of it with simple colors without textures. Additionally there is a light source, variable fog amount, and sometimes a star-field. The trees are procedurally generated using L-systems and are distributed in many different ways using multiple noise functions.
Tree generation
Morten had created procedural trees with L-systems for previous work that we could make use of in this project. This was a huge head-start. During the project he worked on improvements such as support for leaves, a simple wind effect, and improvements to the algorithm.
Distribution of trees
We use a continuous noise function to distribute the trees. The function is evaluated twice - once at low frequency and once at higher frequency - and the values (between 0 and 1) are multiplied together. Simply put, this creates large clumps consisting of smaller clumps.

The resulting function is still between 0 and 1. For each position in a grid, we evaluate the function. The the function value is greater than a certain threshold, we place a tree.
The threshold value is different from scene to scene. We also add a random value to the threshold for each tree placement to make the edges of the clumps of trees more fuzzy. This randomness amount is also different from scene to scene. The result can create anything from dense forests to sparse savannas, and within a single scene, trees are not uniformly placed but clumps nicely in groups.
Color palettes
An important element of evoking different moods despite the simple means is in the color selection. First an initial color is chosen. This is done is HSV color space, where hue, saturation, and value are all values between 0 and 1. (The Value in HSV means brightness; not to be confused with lightness.)
A palette is created from the initial color by creating either a pair of complementary colors from it, or a color triad. The initial color determines the saturation and value of all the colors in the palette. This is a simple way to make the palette look consistent and harmonic.

Some extra color variations are created, and each scene element is then assigned a color from this palette. Each element knows its "normal" color and will attempt to choose a color from the palette similar to that. This will often result in natural landscapes with green grass, blue sky, brown branches, and green to red leaves. Sometimes though, nothing close to those colors will be available in the palette, and the result may be more surrealistic.
One thing I found during development was that palettes with low value (brightness) and high saturation always seemed to look bad. While I don't know for sure, my theory is that it's related to night vision. In our demo, a dark palette makes everything darker, including the sky, so it's synonymous with a darker light level, meaning dusk, overcast, or night time environments. In low-light environments, the color vision ability of the human eye becomes less effective, and the night vision ability - which is in gray-scale only - plays a larger role. So I think there's an expectation that low light environments don't have saturated colors, since our color vision is mostly out of play.

In any case, to avoid the unpleasant looking saturated dark colors, we simply multiplied the value (brightness) onto the saturation.
Soundscapes
Two thirds into the development, we showed the demo to Andreas who were making sounds for other jam projects too. In a short amount of time he managed to bang out soundscapes that added a lot of atmosphere to the demo while having zero constraints on how they should be played. The multiple pieces of sound files had different length but were each either non-rhythmical or only sporadically rhythmic, and they could be played on top of each other randomly and still sound good. The result is not always harmonic, but it intentionally uses the disharmony to create hypnotic soundscapes that interweaves between beautiful calm and eerie.
The sound files sounded fine all just playing simultaneously at the same value, but I added some extra variety by randomly adjusting the volume levels.
Cinematography
During development of the demo, I got tired of walking around manually using a first-person view, and pressing a button to change the environment. It seemed unnecessary to what we were doing, so we decided to make the camera movement and scene changes automatic instead. Non-games were encouraged and fully accepted in the two jams respectively anyway.
For camera movement we initially had a camera zooming fast by the trees, but following a tip from Tim Garbos to slow it down a lot made the scenes come much more to their right. Late in the process we settled on some variations of camera movement: Successive shots would vary between moving the camera forward or panning sideways left or right. It would also vary between being position at eye height (most common) or above the trees for a grander overview (more seldom).
We experimented with different ways of fading between shots. A cross-fade was impractical due to the need to have two scenes active at the same time, but we tried fading to black or white. Frequent fading detracted from the experience though. In the end we used no-frill cuts, but had every third cut be bridged by a dramatic cut to black inspired by the opening to Vanilla Sky. I joked that we should win the award for pretentiousness if the jam had one.
Some tweaks were made after the Exile Jam was over, while ProcJam was still running. I made the groups of three scenes in between black cuts thematically coherent by keeping certain variables constant between them. While most variables are randomized in every new scene, the palette saturation and value, the fog amount, and the camera movement mode is only changed when a "black cut" happens. This lets you experience small variations of a theme with the black cuts resetting the senses in between changes to new themes.
Future work
While there is a lot of ways the demo could be expanded and improved, we don't have any future work planned for this demo in itself. For me, I'm going to use what I've learned about creating variety in environments for my own other procedural projects.
We've also made the source code for this demo available and if you do anything with it, we'd love to hear about it!
My 3rd Person Shooter on Kongregate
OMG the 3rd Person Shooter demo I made in the beginning of the year has ended up on popular web games portal Kongregate. The game has had 20,000 plays so far and counting and has a rating of over 4.1 out of 5. I'm totally flattered. :D
UPDATE: Kongregate took down the demo after enough other Unity games had been submitted that the demo was not needed to demonstrate Unity anymore.

I made the demo at work at Unity back in the beginning of 2010 to demonstrate various animation techniques, and I ended up making it into an actual game (albeit a small one). Since then it has been possible to play it on the Unity website. The demo was based on a tech demo that Paulius Liekis and I did for a presentation about animation techniques at Unite '09.
So the reason it ended up on Kongregate: Kongregate, which used to host only Flash games, has just announced that they have opened up for Unity games too (and they're having a grand Unity Game Content to kick it off!). They wanted to show their users a simple demonstration of just how great things can be made with Unity, and they picked this Unity demo for that purpose.
So - a little known fact is that I did the voice work for this demo; totally unprofessionally too, but it brings a lot of humor to the game. Reading the comments from users on Kongregate, it seems that it's appreciated. :D
A lot of the comments a very positive or out right hilarious. A few examples:
"Takes long to load, but definately worth it. 5/5"
"Wait... This is an actual 3-D game, without lag... And it's not one of those ones with just 3D sprites and whatnot... YES!... YES!... THIS IS DELICIOUS!"
"Cant wait for the sequel Unity demo 2: Better run! and the spin-off game "how do I get behind it?" and don't forget the T.V gameshow "YEAH, Ha Ha, Take THAT!""
"ZOMG!!! love the voice"
"should i pull out my second gun to shoot it with? nooo! why would i do that?"
"lol i love the voice acting :)"
"WOOT! I lost in no fail mode! Robot sploded on my head +)"
"i like the ragdoll physics unity 3d has (this and dead frontier) its fun i killed it on medium ran towards it and BOOM i went flying"
"This. Is. So. Mother. Freaking. Awesome."
"AMAZING Graphics! I Have To Say 5/5 I'm Gonna Devo For This ;)"
"This is actually real?!?! Oh my God the graphics..."
"This game could change the history of kongregate. 3D games Zero lag."
"best graphics on kongregate ever"
"R.I.P. Flash 'Nuff said?"
"BOOOM!sorry that was just my BRAIN exploding from awesome!!!!!!"
I'm famous! Well, except the thing was not posted in my name so nobody will know. Oh well. :P
The Cluster: Demo of Hunting AI and New Models
This post is about The Cluster, my 2.5D platform game under development with focus on non-linear exploration, set in a big, continuous world. You can read all the posts about The Cluster here.
Like I wrote about a few weeks ago I've been working on pathfinding and AI for the enemies in The Cluster. The AI pathfinding is now reasonably stable and there's a working demo below where you can fight against simple hunting enemies. Right now the enemies always know where the player is; later the knowledge of most enemies will be made less global and more based on local memory.
I've also been working on some new character models and animations. The new animations in particular bring the player avatar and enemies a lot more alive! Even though I'm a complete amateur as an animator, the crude animations I've made still make the character a lot more fun to watch, I think. :)
Here is a simple playable demo of the current state of the game (requires Unity plug-in):
Controls: Arrows to run, Ctrl to jump, Alt to shoot fireballs.
Again, this demo is just a "tech demo" and features no way to win. It extends infinitely to the right. Enemies should be able to chase the player almost everywhere, but they can't pass the checkpoints (the white monuments).
Like I wrote about before, I'm still not sure what gameplay elements would be best at making agile enemies like these the most fun in a platform game. Have a go at the demo above and then let me know if you have some ideas for how to make this gameplay more fun!
The Cluster: Demo of Procedural Environment
This post is about The Cluster, my 2.5D platform game under development with focus on non-linear exploration, set in a big, continuous world. You can read all the posts about The Cluster here.
I'm taking a break from pathfinding and AI to go back and talk about the raw level design in The Cluster; More specifically the procedural generation.
The entire world in The Cluster is procedurally generated at runtime, though it is consistent, meaning that the world will be the same every time you play. However, this is strictly a design choice, not a technical limitation, and I'm considering including some kind of bonus areas or similar that will be different every time.
To give you an idea of the current state of the game, here is a simple playable demo (requires Unity plug-in):
Controls: Arrows to run, Ctrl to jump.
This demo is just a "tech demo" and features no enemies and no way to win. It extends infinitely to the right.
Back in 2007 I explained the procedural level generation of the game. The game has changed a lot since then - among other things it has turned from a tile based 2D game into a 2.5D game with 3D graphics - but the basic method of generation is still the same.
You can actually see the maze map in-game in the demo above by pressing 2. Press 1 to hide the world to only see the map. You can zoom a bit out by pressing Z, X zooms back in, and you can pan around using WASD. Press Esc to reset the camera.

A map of the maze that the area is based on.

The map overlayed onto the actual generated area.

The generated area by itself.
One feature not explained in depth on the page linked to above is the placement of locked doors and keys in the game. The game places locked doors and keys in a "perfect way" such that it is always necessary to find all keys and unlock all doors to be able to proceed, and a "deadlock" will never occur, where the key for a door is placed behind that door. The placements are calculated using a simple algorithm I came up with which is based on dividing the area up into a binary tree and then placing keys in leaf nodes and locks in inner nodes in a specific way. Several years after implementing it, I found this article about "Environment Tree" at Squidi.net. It's basically the same algorithm, so rather than explaining it myself here, I'll refer to that.
A nice aspect about the algorithm is that it supports placing keys both sequentially and nested. In the screenshots above, the red door is sequential in the sense that all the following keys and doors are on the far side of the red door, so once you've gone through it, you don't have to go back. The green door, however, is nested. You go through the green door, pick up the blue key, and then go back out the green door in order to proceed. The algorithm doesn't have separate handling of sequential versus nested key and door placements; these are just emergent properties so to speak.
If there's any interest I can cover other aspects of the procedural generation in The Cluster in coming blog posts.
Maze Raiders: Good Old Two-Player Fun
Maze Raiders is a two-player game I made together with three other people back in 2004. You need to sit two persons by the same computer to play the game.


The objective of the game is to run around in a maze and collect more gold coins than your opponent, and to shoot him and steal his coins. The game sports randomly generated mazes each time you play to keep it fresh. There's two different scenarios - jungle and pyramid. It's classic local two-player fun!


Though we were all game design novices, we managed to balance the rules to make for a frantic game that just keeps being fun to go back to. When all coins in a maze are collected you have one minute to try to steal coins from your opponent. During this time the player with fewer coins moves faster than the other player. It's just enough that it's not too late to change the tides, and it makes for a panicked final chase before the time runs out, sometimes with the roles switching multiple times.
In 2004 when the game was made there was no indie game movement to speak of so we had nowhere to announce the game - particularly a game of such a small scope. All we could do was submit it to software distribution services like Tucows and FilePlanet. Ha, things sure have changed since then! I thought I'd take this opportunity to put the game online and let others know about it. Enjoy!
3rd Person Shooter Unity Demo
At work I've been working on a Unity demo to demonstrate various animation techniques, and I ended up making it into an actual game (albeit a small one). You can read more about it - and play it! - here:
New Character Animation / 3rd Person Shooter Demo
It's based on a tech demo that Paulius Liekis and I did for a presentation at Unite '09. You can see a video of the presentation here:
What I did at Nordic Game Jam
This weekend I participated in the Nordic Game Jam - the first and biggest instance of the Global Game Jam event.
The basic idea is that lots of people meet and split up into small groups that each make a game in about 40 hours. That's some seriously intensive game making, which is very exciting and fun (and exhausting). Because the games are so small and quick, there is unlimited room for wild experimentation which would not often be risked in larger scoped games with more serious commitments.
In my group we made Preschool Theater Director - a game where you have to direct a chaotic set of pre-school kids in order to enact Shakespeare's "A Midsummer Night's Dream" on the stage in front of a demanding audience of parents. You can play it online here via the Unity browser plug-in.

The game is over quite quickly (if you can remember the names of the children anyway) but the graphics and sound design and general sense of attempting to direct small clueless kids makes it for a funny experience.
Florian Sänger made the graphics, Bernie Schulenburg the sound and voices, Kasper Clemmensen produced the music, and Nils Deneken contributed with bits here and there though he was busy working on another game at the same time. Lau Korsgaard helped with some initial prototype programming before family commitments took over. After that I was the only programmer on the game which made me somewhat of a bottleneck, but I'm glad we got it into a state where it's fully playable and actually a bit of fun.
Fully Automated Blending, Revisited
One of the things that makes the Locomotion System easy to setup and use is the fact that it automatically analyzes the velocities of all the input walk and run cycles and plots them into a velocity map. At runtime the system automatically assign appropriate blending weights to the animations, such that the closest neighboring animations (in terms of their velocities) get the highest blending weights.
While developing the system I tested this blending with as few as 2 sample animations (1 idle and 1 walk cycle) and with a much as 9 (1 idle, walk cycles in 4 directions, and run cycles in 4 directions).
A user in the Unity community, Chris Mansell Aka. Capnbubs, has now posted an early preview demo of a game he is developing, which utilizes the Locomotion System. In it, the avatar walks and runs with easy in a landscape with cliffs and hills.
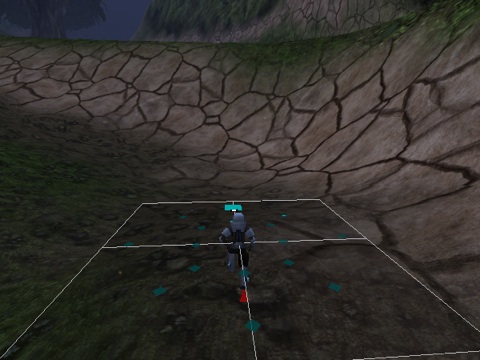
Chris informs me about the animated character:
I've got walk and a run animations, each in 5 directions, three of them mirrored for moving backwards.
In other words, walk and run cycles in 8 directions, which makes for a total of 17 animations when also including the idle. The image above depicts a visualization of the velocities of the animations plotted into the velocity map.
I only ever tested with half that many animations myself, but the automated analysis and the runtime blending based on scattered data interpolation ensures that it still just works out of the box. Also, the built in ability to make an animation double as its backwards equivalent means that Chris effectively got 17 animations although he only made 11.
Locomotion System at GDC 2009!

The Game Developers Conference 2009 is near and I am proud to announce that my session proposal has been approved! I will be doing a 60-minute lecture in the Programming track on the subject of:
Dynamic Walking with Semi-Procedural Animation
(Follow the link to see the session description on the GDC website.)
I am honored to be presenting my work in the company of the great minds of the game industry at such an early point in my career. This is the second time I am going to GDC and I am truly looking forward to it.
Updated Interactive Demo
Now, since I'm updating the blog anyway, I have thrown in the latest version of the uneven terrain demo that I have used as a testing bed for the Locomotion System. New in this version is a coyote, as well as lots of visualization options that you can play around with to get an idea of the inner workings of the system. This is the same version that was used for the Video Demo 2 of the Locomotion System in the previous post.
Instructions for the demo
| Command | Keyboard | Gamepad |
|---|---|---|
| Walking-direction | arrow keys | analog stick 1 |
| Walking-speed | shift | - |
| Facing-direction | W, A, S, D | analog stick 2 |
| Jump | space | button A |
| Time slow down / speed up | numpad - / + | - |
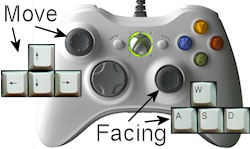
You can control the characters with either the keyboard or with a game pad. With a game pad, such as an XBox 360 controller, the direction and speed can be controlled precisely with ease, while independently controlling facing direction with the secondary stick.
In this demo the terrain can be dynamically controlled with the sliders at the top. You can create stairs, slopes, and various combinations. The terrain will reflect the changes once the character has walked a little distance to the left or right. Enable manual mode to control the character yourself, as described above. This demo uses four animations for walking (forward, backwards, and sideways) and also four for running.
In other news
Besides having my session at GDC accepted, a few other notable things have happened recently:
- I have moved from Aarhus to Copenhagen (both are cities in Denmark; Copenhagen is the capital) together with my girlfriend.
- I have started working at Unity Technologies, a company making an extremely cool game engine and authoring tool called Unity.
- I am still working on finishing my Master thesis about the locomotion system ... it will hopefully be done soon!
That's it for now. I hope to see you at GDC!
3 Demos and New Blending Feature
Lots of demos you can try this time - yay! Tip: For better performance, unload one demo before you view the next.
Instructions for all demos below
| Command | Keyboard | Gamepad |
|---|---|---|
| Walking-direction | arrow keys | analog stick 1 |
| Walking-speed | shift | - |
| Facing-direction | W, A, S, D | analog stick 2 |
| Jump | space | button A |
| Time slow down / speed up | numpad - / + | - |
You can control the characters with either the keyboard or with a game pad. With a game pad, such as an XBox 360 controller, the direction and speed can be controlled precisely with ease, while independently controlling facing direction with the secondary stick.
Climb the crates and boards. Use shift to run; default is walking. Note that this demo only uses one animation for walking and one for running.
In this demo the terrain can be dynamically controlled with the sliders at the top. You can create stairs, slopes, and various combinations. The terrain will reflect the changes once the character has walked a little distance to the left or right. Enable manual mode to control the character yourself, as described above. This demo uses four animations for walking (forward, backwards, and sideways) and also four for running.
Walk around this structure in space with crazy gravity! (Nobody said anything about Mario Galaxy...)
Animation groups
I have worked hard on finding a way of making the Locomotion System easy to integrate with an existing animation framework in a game while keeping it flexible.
I have now implemented a feature where animations used by the Locomotion System are grouped together in animation groups. For example, animations for walking and running in different directions could be put in a single animation group.
The group as a whole can be controlled manually the same way as regular animations are controlled in Unity, while the blending of the individual animations in a group are automatically controlled by the Locomotion System. Furthermore, the system supports using multiple animation groups, so e.g. one group can be used for normal walking and running (in all directions), and another group for sneaking (in all directions).
The new feature can be seen in the demos above in two ways:
- When the character jumps, an animation is cross-faded in that is not controlled by the Locomotion System. This way the feet do not attempt to stay on the ground while the character is jumping.
- When the character is standing still for a little while, an "waiting" animation is cross-faded in. Since this animation is also controlled by the Locomotion System, the feet stay properly grounded.
Testing the Locomotion System
I make the Locomotion System as my Master Thesis in collaboration with Unity Technologies. It will be available for free for users of Unity once it is finished.
As a part of my thesis, I want to test the usability of the system. If you are a Unity user and would like to try out the system and help me by evaluating it, please let me know! The Locomotion System is by no means finished yet, but it is now almost at a stage where it is ready for preliminary testing.
Also, comments are much appreciated!
3 New Features
I have just improved the system with three new features:
- Support for using walk cycles backwards. So for example a forward walk cycle can be used as a backwards walk cycle too (in lack of something better).
- Auto-synchronization. All walk and run cycles are now synchronized so you don't have to tell your animators "all animations must start on the left foot" or similar.
- Slightly more intelligent foot placement. It attempts to avoid ledges. The system now traces two rays per foot per frame in order to make this possible.
(More details below.) These improvements have been of benefit for the Soldier guy in particular, that only use 3 animations: idle, walk, and run. He now walks much more fluidly in all directions, though still not nearly as well as the Hero guy, with 9 animations. Click the image below to view the demo.
Instructions repeated for your convenience
When manual control is turned on, you can control with either the keyboard (arrow keys for walking direction, and optionally WASD keys for facing direction) or with an analog controller, which I highly recommend. With an analog controller, such as an XBox 360 controller, the direction and speed can be controlled precisely with ease, while independently controlling facing direction with the secondary stick.
The terrain can be dynamically controlled with the sliders at the top. You can create stairs, slopes, and various combinations. The terrain will reflect the changes once the character has walked a little distance to the left or right. The sliders will also be changed at random while not in manual mode.
Support for using walk cycles backwards
Since one of the goals of the system is to make great animation available to even small developers with limited resources, the ability to use the same walk cycle for two things is very handy. Not only can a forward walking animation be used as a backwards walking animation too, but the system can also use a blend of the forward and backward animations for walking sideways. The forward-backward blend results in a sort of neutral stepping on the spot motion, which is better suited for adapting to side-stepping than either the forward or backward animations alone.
Auto-synchronization
This one solves a whole host of problems. If animations are not properly synchronized before they are blended, it results in all kinds of weird motions, quirks, and problems. The traditional approach is to make sure the animators animate the cycles synchronized, so that for example all walk and run cycles starts with the left foot being on the ground, approximately under the character. However, this manual synchronization doesn't always work out very well. Also, when considering the backwards support feature mentioned above, the restrictions are even tighter.
This is why I have implemented auto-synchronization. The system now calculates an offset for each walk and run cycle that makes it match the other cycles as well as possible. At runtime in each frame, these offsets are applied individually to each motion prior to blending them.
The auto-synchronization works by comparing the stance times of each leg in each cycle with the stance times in the other cycles. (The stance time is the time in the cycle when the foot is standing most firmly on the ground.) The offsets are calculated by applying a kind of spring system to the stance times in each cycle, so that each stance time is attracted towards the stance times of the same leg in the other cycles. Over a few iterations (less than 20 in my tests) the stance times get increasingly closer until they are practically overlaid. Each iteration is O(N^2) where N is the number of cycles, because each cycle is compared to each of the other cycles. However, since this calculation can be done once at pre-compile time, it doesn't have any speed penalty at run-time.
More intelligent foot placement
The feet now land on the ground a bit more intelligently. For each foot two rays are cast towards the ground; one from the heel and one from the toe-tip. Depending on whether one of them or both hit a usable spot, the foot is placed either between the two points or on one or the other. This prevents the most glaring intersections with geometry. However, a more sophisticated system might still be implemented at a later time.
Help me test the system
I make the Locomotion System as my Master Thesis in collaboration with Unity Technologies. It will be available for free for users of Unity once it is finished.
As a part of my thesis, I want to test the usability of the system. If you are a Unity user and would like to try out the system and help me by evaluating it, please let me know! The system is not ready for testing yet, but it won't be long now.
Also, comments are much appreciated!
Adaptive Walking Preview II
I have not been good at updating the blog lately, but here's a new preview of the Locomotion System! Now characters can walk in any direction (forwards, backwards, sideways, and anything in between) with any speed. Characters can also start and stop walking with proper transitions. Click the image below to view the demo.
When manual control is turned on, you can control with either the keyboard (arrow keys for walking direction, and optionally WASD keys for facing direction) or with an analog controller, which I highly recommend. With an analog controller, such as an XBox 360 controller, the direction and speed can be controlled precisely with ease, while independently controlling facing direction with the secondary stick.
The terrain can be dynamically controlled with the sliders at the top. You can create stairs, slopes, and various combinations. The terrain will reflect the changes once the character has walked a little distance to the left or right. The sliders will also be changed at random while manual mode is not enabled.
Models and animations
The demo shows off three characters, all kindly provided by Unity Technologies. Press ENTER to switch between them, or press the switch button.
- The HERO character has 9 animation: 1 idle, 4 walking, and 4 running. The system automatically blends between the relevant animations based on direction and speed.
- The SOLDIER character only has 2 animations: 1 idle and 1 walking (forward). The walking is extrapolated by the inverse kinematics in the Locomotion System to also work for sideways and backwards motion, but it doesn't look as good as when animations are provided for those directions.
- The HERON character also only has an idle and a walking animation. (Note that the Heron model is facing in the -Z direction, so it's a bit odd to control.)
Features
A lot of the features I set out to implement are done by now. Still missing are:
- More intelligent foot placement mechanism that avoids ledges. The current system simply traces a ray from the heel of the foot.
- Some way to avoid feet and legs intersecting when walking in certain directions (usually sideways). Regular blending inevitably leads to this glitch, so special logic is required to handle this.
I will post more details on the technical details later.
Request for models!
I have tested the system with several biped (two-legged) characters but i am in DIRE NEED of animated models with more than two legs to test with! If you have any characters I may use as test data for this project, it would help me a lot. Models will only be used for testing and not in public demos unless explicit permission is given. Also, I will put a thanks in the Master Thesis.
The models can be anything really: animals, aliens, robots, or whatever, as long as they use legs to move around with! I can import models up to Maya 8.5 and in .fbx format. Animations work best with the system if:
- There is at least one idle animation and one walk or run animation. But the more, the better!
- The feet don't intersect too much with the ground (though a little don't hurt).
- The feet move backwards (for e.g. a forward walk) at a somewhat constant speed while on the ground (though the system can fix small variations).
If you are in doubt, just send away! Even animations that don't work still show me something valuable about the limitations of the system.
Help me test the system
I make the Locomotion System as my Master Thesis in collaboration with Unity Technologies. It will be available for free for users of Unity once it is finished.
As a part of my thesis, I want to test the usability of the system. If you are a Unity user and would like to try out the system and help me by evaluating it, please let me know! The system is not ready for testing yet, but it won't be long now.
Also, comments are much appreciated!
First Preview of Adaptive Walking
I just finished the first presentable demo. It is just one character with a fixed animation for now, and the foot step placement doesn't yet attempt to avoid intersecting geometry, but as an appetizer of what is to come, it will do. Click the image below to view the demo.
The demo above is made from just one animation that was made for walking straight ahead on a plain surface. There are two primary techniques that were used here to make the animation look quite acceptable when the character walk up or down steps:
- The system maintains the original ankle local rotation while the foot is in the air, and only enforces a re-alignment of the foot while it is on the ground. While landing on the ground and while leaving the ground, a blending between these two modes of operation is used.
- The system keeps track on when to use the heel and when to use the toe as the point of reference relative to the ground. This is based on which one is closer to the ground at any given point in time.
The features to be implemented next are:
- Blending between several animations.
- Support for walking on sloped surfaces.
- More sophisticated step length / step frequency mechanism.
- More intelligent foot placement mechanism that avoids ledges.
Anyway, I'm glad to finally have something to show, even if it isn't much for now. Comments are much appreciated!
Walk and Run Cycle Analysis 2
In the past week I have been continuing my work on a script to analyze the movements of the feet in walk and run cycles. The primary new result is the analysis of foot lifting and landing times. By analysis the script finds these times for each foot:
- Lift time: When the foot begins to lift from the ground.
- Liftoff time: When the foot lifts off completely from the ground.
- Strike time: When the foot first touches the ground again.
- Landing time: When the foot has fully landed on the ground.
These times can be seen in the bottom graph in the interactive analysis visualization here. Click to activate it.
Note that the graphs refer to the ankle and toe of each foot. What they really measure is the ankle and foot positions projected onto the ground at the stance pose, i.e. points on the underside of the foot. Since these projected positions are approximately at the heel and toe, I will be referring to heel and toe positions below.
Previous work
Automatically finding the foot lifting and landing times can be tricky, especially if the animations that are being analyzed are not of the highest quality.
In the paper Adapting motion capture data using weighted real-time inverse kinematics by Michael Meredith and Steve Maddock, foot flight paths are extracted from motion capture data using a curve gradient analysis technique:
Our approach for retrieving the flight path from the motion capture data is based primarily on a gradient analysis technique where, over the course of the original motion, we analyze the height value of one of the character's feet. The first target we look for is a switch from a negative to a positive gradient on a frame that is within 10% of the global minimum height for the foot. This gives us the start of the foot flight where the foot is just about to leave the ground.
From the first target, we progress along the original flight path until we meet a second gradient change from positive to negative, which is on a frame whose height value is within 10% of the global maximum. This second target is the peak of our flight height. Continuing along the original path, we locate the third and final target via one last gradient switch from negative to positive, whose frame height is again within 10% of the global minimum. This technique is demonstrated pictorially in Figure 2.

I have been inspired by this technique by Meredith and Maddock. However, in my own tests I have found their procedure insufficient to properly handle the very varied animations I have used as test cases for my system.
Tricky animations
In my test animations, the feet don't always actually lift up from the ground when the legs starts to swing forward, but rather sort of drags along the ground. Also, the feet sometimes intersect with the ground, which also makes the analysis non-trivial.
In order to make the analysis error-tolerant in these kinds of scenarios, I have used several rules in combination to find the foot lifting and landing times.
New rules for the analysis
The new rules are highly dependent on the stance time which was described in the previous post. The stance time is the time where the foot is standing most firmly on the ground. Starting from this, the new rules are used to find the lifting and landing times fo the feet. The same rules are applied both for finding lifting and landing times, and they are used on both the heel and toe Y movement curves (i.e. vertical movements). They are as follows:
- Start following the Y movement curve from the stance time and forward (/backwards) until the height curve reaches 10% of the maximum height of the curve. The lifting (/landing) must come before this point.
- Inside this span of the curve, find the point with the maximum curvature (the maximum second derived of the curve, i.e. the most sudden rise in the curve).
- Disregard points on the curve that are below the ground level.
- Disregard points on the curve where the first derived (i.e. the slope) is below zero (or above zero when searching backwards).
These rules combined will almost surely find the point on the curve that intuitively looks like the point where the curve starts to rise from the ground. However, another check has to be made. This check is made for the foot Z movement curve (i.e. the swinging back and forth of the foot).
- Start following the Z movement curve from the stance time and forward (/backwards) untill the slope is more than 50% different than the slope at the stance time. Since the speed at the stance time is the point of reference for the ground, a speed that deviates more than 50% must mean that the foot is no longer following the ground, and thus no longer standing on the ground. If this time occur before the lifting time (/landing time) found by the other rules, then this time is used as the lifting time (/landing time) instead.
The 50% value here has been chosen by trial and error from the test animations. For a completely accurately animated character, the feet should be moving with a completely constant speed while they are on the ground since the ground is moving backwards with a constant speed relative to the character. However, this is not always the case in actual keyframed animations, and the speeds of the feet can be quite inconsistent. Thus a large tolerance value has to be used.
Motion synthesis next
The next step is to use the motion analysis data to synthesize adaptive walking and running animations. Using the lifting and landing times, the foot flight paths and the analyzed speed of each animation, new paths for each foot can be generated in accordance with the environment and variable movement of the character.
Walk and Run Cycle Analysis
I have been working on a script to analyze the movements of the feet in walk and run cycle animations. From this analysis the speed of the character can be determined, as well as when and where the feet touch the ground. Click to see the analysis in action here:
3 graphs
There are three graphs shown in the view.
- The bottom graph show the vertical movements of the ankle (red curve) and toe (green curve).
- The middle graph show the horizontal movements of the ankle (red curve) and toe (green curve). It also shows a black curve that is a weighted average between the ankle and toe curves.
- The top graph shows the balance of importance between the ankle and the toe, based on which is closer to the ground. This curve is used as the weighing factor for the black cuve in the middle graph.
Stance time and speed
Also, the analysis finds a "stance time" for each foot. This is the time when the foot is most firmly standing on the ground. The graphs are shown such that the stance time is always at the left side of the graph for all feet. This way, is is easy to compare the curves of the different legs and the different animations.
The stance time of a foot is determined by finding the point in time when the ankle height and toe height are as low as possible. It is important that they are both low, so rather than using the average of ankle and toe height, the maximum of the two is used.
By sampling the horisontal movement of the foot at points in time around the stance time, the overall speed that the character is moving with can be concluded. It is important to determine the movement of the foot from the part of the foot that is currently closer to the ground, thus the black curve from the middle graph is used. Using just the ankle movement or just the toe movement would give incorrect results.
Test data
I have tried to design the analysis such that it makes as few assumptions as possible. There are a few though:
- The character must be aligned with Y = up and Z = forward.
- The animation must contain only one cycle, i.e. one step with each foot. For that reason, skipping is currently not supported. There doesn't have to be any symmetry in the steps though, so e.g. a gallopping horse should work fine.
Currently the analysis method has been tested with a soldier character with a walk cycle and two run cycles as well as a robot character with a run cycle. I would like to test the system with many more characters and animations, including creatures with more than two legs, so I am currently looking into ways to get more material to test with. The goal is to create a robust analysis that can correctly interpret most animations that are thrown at it.
Adaptive Animation for Character Locomotion
I have just begun working on my Master Thesis, which I will be making in collaboration with the company Unity Technologies that make the awesome Unity game engine.
The Master thesis will be about "Adaptive Animation for Character Locomotion", which basically means creating a system for adapting walking, running, and crawling keyframed animations to a dynamic environment. The system will take curved paths, uneven terrain, and variable speed into account all the while ensuring graceful footsteps without slipping feet and motions that stay as faithful as possible to the original keyframed animations under the given restraints. Inverse kinematics is one of many techniques that will be involved in this.
Goals and perspectives
The system is meant to be generic in nature, working not just for biped characters (with two legs) but also for example for dogs, bugs, and spiders and, say, robots and aliens, provided that they move around using a limited number of legs. This list of features is the ideal case - time will tell how far I get within the timeframe of my Master Thesis. Hopefully I can continue working on the project after my graduation, if necessary.
In the end, the result of my work will be made available to all users of Unity free of charge, for any use. I hope to get people from the Unity user community involved in testing the system as it is developed, since one important success criteria is the usefulness and usability as perceived by the developers using the system. It will take some time before the first prototype is ready though, as I've only just begun.
The project up until now
My original "pitch" of the project to Unity was a presentation based on this slideshow:
A few ideas have already changed since that. For one thing, the idea that animators must enrich the animation cycles with additional data has been abandoned. The data needed is for example information about when exactly each foot leaves the ground and land on the ground again. The new plan is that this will be automatically analyzed and calculated by the system. More on that in a later post.
In order to quickly get my feet wet, I've made this little demo, where I have modified the Goober guy that comes with one of the Unity tutorials, and made his legs use some very simple inverse kinematics:
Click the image to make the demo run in the browser. Just click yes to install the Unity browser plug-in. Note that in this simple demo I simply adjusted the altitudes of the feet, so feet slippage etc. are not prevented. The actual system will work in a completely different way.
I have already gotten some interest and positive feedback in the Unity forums. Stay tuned!