Supercharging my procedural mountain forest
I've published a new video about how I've made my procedural mountain forest bigger, better and faster over the past two years:

Links to things mentioned in the video
My previous video about my procedural mountain forest.
My LayerProcGen framework and my talk about it at Everything Procedural Conference 2024.
My free game The Cluster (full trailer), which my LayerProcGen framework was originally developed for.
My blog post about the procedural creatures I alluded to.
The GPU Instancer Pro (Asset Store) third party tool I use for GPU instancing with frustum and occlusion culling.
The Grasslands - Stylized Nature (Asset Store) model pack I use for my new trees.
My blog post about my Point Cloud Sound technique.
My blog post about the game progression dependency graphs I alluded to.
My erosion filter video and blog post. The links section at the end of the blog post has links to implementations by others in various engines, tools, and games.
A GitHub Gist demonstrating shared C# and shader code.
My blog post about atmospheric perspective and distant mountains.
Frequently asked questions
The trees are popping. Could you fade them in instead?
Not very easily. The trees already use dither-based fading between the tree LOD levels. When you see trees pop into existance, it's because a terrain chunk is replaced with terrain chunks of a more detailed LOD level that has denser tree coverage. Fading the new trees in when this happens would require having an additional fading feature on top of the one used for tree LOD levels. Not only would it make the tree shaders more complex, it would also be a lot of work to route the required data into all the tree instances. It would require changes to GPU Instancer Pro third party tool I'm using, or else I'd have to use it in a significantly more low-level way. Either way, it's frankly beyond my skill level, as I'm not nearly as proficient with shader "data plumbing" as I am with shader math.
Point Cloud Sound for irregular shaped audio sources
In video game development, we’re used to sound coming from single positions in space, but how do we handle sound coming from an irregular shape?

One technique is to move a regular point audio source to the position inside a volume that’s the closest to the listener. This works fine for convex shapes, and I’ve used it myself in my game Eye of the Temple for the sound coming from a rumbling ceiling trap that’s lowering down, and for the lava floor in a big chamber.
But for non-convex shapes, the closest-point approach has some issues.
Imagine a heavily winding river where a single point on land is equally close to two completely different spots on the river. Here, the closest-point approach will switch abruptly from one position to another if the player moves just a tiny bit in one direction or the other.

While the volume will be the same (since the two points are equally far away), the direction will change, which can be very noticeable with any directional sound technology, from stereo sound to surround sound to HRTF sound.
Another approach is to just place a lot of audio sources inside the volume of (or on the surface of) the sound emitting shape. This does not have the direction problem of the closest-point approach, but it can require a lot of processing to have a ton of audio sources active at the same time.
I’ve come up with a different approach I call the Point Cloud Sound technique, and since it’s turned out to be highly useful and effective for me for multiple use cases, I thought I’d describe here how it works.
You can see a demonstration of the point cloud sound technique being used for water in this video, at the 4:02 mark (running until 4:48). I recommend using headphones:
This article does not cover every implementation detail. The code snippets cover central aspects of the technique, but are incomplete and require additional implementation to compile and function. My own implementation is tailored to my game and depends on third-party libraries (including a paid one) for various non-central functionality. Since I didn’t want to implement an entire second working implementation, I’ll leave this as an exercise for the reader.
Applicable use cases
Here’s the use cases I’m using it for so far:
- The sound of running water in water streams, at multiple intensities.
- The sound of rustling leaves from thousands of trees and bushes.
- The sound of the player "colliding with" (moving through) the foliage of said trees and bushes.
(Foliage collision sounds work a bit differently from the others, and is something I’ll cover at the end of the post. You can see a short video demonstration of it in my Mastodon post here.)
In all these cases, I don’t really need multiple sounds playing independently.
For example, for rustling leaves I can use a single looping rustling leaves sound no matter if there’s one or thirty trees within hearing range, as long as it feels like it’s coming from the right position(s) in space.
For the water, I need different sounds for different intensities, but again, not merely for different positions in space.
The point cloud sound technique takes heavily advantage of this, using as little as one audio source shared for up to many thousands of points in space. This means the technique is applicable to use cases where there are no individually distinguishable instances, but rather just a general sound of the whole.
Calculating volume manually
With the point cloud sound technique we’ll be defining a set of point samples in 3D space that we’ll be using roughly as if they were individual audio sources.
struct SoundPointSample {
    public Vector3 point;
}

List<SoundPointSample> samples;

public void AddSoundPointSample(Vector3 point) {
    SoundPointSample sample = new() {
        point = point
    };
    samples.Add(sample);
}
But instead of making individual audio source objects for the engine to handle, we calculate a combined volume, direction, and spread each frame, and set those properties on a single audio source object.
Of those properties, volume is the most straightforward, although we need to clear up some things first. I don’t know if some better terms exist, but here I’ll use the term source volume to refer to the inherent volume of some sound source, independent of a listener, and the term attenuated volume to refer to how loudly it’s heard by the listener, taking distance attenuation into account.
Attenuated sound volume, as understood in audio engine term, attenuates according to the inverse distance 1/d. There is a widespread misconception that it attenuates according to the inverse square distance 1/d2, but this is not the case. While sound intensity decreases with the inverse square distance, sound amplitude (= change in pressure) does not, as described here, here, and here. The audio engines I know of get it right and attenuate by the inverse distance, and that’s what we’ll be doing too. (None of this takes audio occlusion into account, which is beyond the scope of this technique.)
I’ll get back to how to define a source volume for each point sample in our point cloud sound. Once we have those volumes though, we can calculate the combined attenuated volume by calculating the sum of each sample’s source volume divided by its distance from the listener (the mic). Easy! We apply this combined attenuated volume to our single audio source object.
// Add up the volumes.
for (int p = 0; p < samples.Count; p++) {
    SoundPointSample sample = samples[p];
    Vector3 dir = sample.point - mic;
    float distance = dir.magnitude;
    float attenuation = 1f / distance;

    // The weight is the attenuated volume.
    float weight = attenuation;
    cumulativeWeights += weight;
}

// Set volume of the combined sound.
source.volume = cumulativeWeights;
Importantly, we need to disable the built-in distance attenuation of the audio source object by e.g. setting a custom volume rolloff curve which is always one. It still needs to be a spatial audio source object though, as we’ll be making use of its built-in handling of direction and spread.
The importance of spread
In Unity, audio sources have a 3D sound setting called spread, and other audio engines usually have similar concepts. Spread is more subtle than volume and pitch, but central to the point cloud sound technique.

A non-zero spread emulates sound coming from a spread of directions rather than from a single point. In Unity, spread can go up to 360 degrees, but that makes a sound come from the opposite direction of where it’s at, which is rather useless. Instead, I consider a spread of 180 degrees in Unity to actually represent 360 degrees, indicating that sound is all around the listener. Unity treats a spread of 180 degrees as the left and right audio clip channels (if the audio clip is stereo) being played 180 degrees apart. This ensures there’s about equal sound in both output channels no matter which way the listener is facing relative to the sound. If the audio clip is mono, it’s the same thing, except the left and right "input channels" are identical.
In the rest of this post, I’ll be talking in terms of a normalized spread going from zero to one, where zero means the sound comes from a single direction, and one means the sound comes equally from all directions.
The spread property means we can avoid the issue from the closest-point approach, where the apparent direction of a sound changes abruptly. We can avoid this with the point cloud sound technique by ensuring the spread is one (full spread) if the listener is equally close to two points in opposite directions. More generally, the more a single direction dominates, the smaller the spread should be, and the more different directions contribute equally, the larger the spread should be. Now let’s go into how to actually calculate it.
Calculating direction and spread
Since we have an arbitrary large number of audio point samples, but only one audio source object, we need to calculate an average direction the sound is coming from. We can’t take the average of the vectors to each point sample (relative to the listener), since this would mean point samples further away would have a larger contribution.
Instead, we average the normalized directions. That is, the vectors from the listener to each point sample have each been normalized to have a length of one before we average them.
On top of that, we need to make sure that point samples which are heard more loudly contribute more to the average direction. So instead of taking an even average, we take a weighted average, using the attenuated volume of each point sample as its weight.
// Add up the volumes and directions.
for (int p = 0; p < samples.Count; p++) {
    SoundPointSample sample = samples[p];
    Vector3 dir = sample.point - mic;
    float distance = dir.magnitude;
    Vector3 dirNorm = dir / distance;
    float attenuation = 1f / distance;

    // The weight is the attenuated volume.
    float weight = attenuation;
    cumulativeWeights += weight;
    cumulativeDirs += dirNorm * weight;
}

// Calculate a weighted average of the normalized directions.
Vector3 averageDir = cumulativeDirs / cumulativeWeights;
With our average direction calculated, all we need to do is place the audio source object somewhere in that direction, relative to the listener. A simple approach is to always place it one unit away from the listener. Since we’ve disabled the built-in volume attenuation, the exact distance doesn’t matter for the volume at all.
Now, as to how to calculate the spread, I came up with a surprisingly simple solution I’ve found to work really well. Consider that while we’re taking a weighted average of normalized directions, the result is not itself normalized. The more different the averaged directions are from each other, the smaller the resulting vector is. If they (theoretically) are exactly evenly spread out in all directions, the resulting vector has a length of zero. This correlates perfectly with what we need for our spread parameter. We can simply set the normalized spread to be one minus the length of the averaged direction.
// Set volume, direction, and spread of combined sound.
source.volume = cumulativeWeights;
float averageDirMag = averageDir.magnitude;
source.position = mic + averageDir / averageDirMag;
source.spread = Mathf.Clamp01(1f - averageDirMag);
A small note about placing the audio source object one unit away: This is fine for stereo sound, but for HRTF sound, it may not produce the best results (I haven’t investigated). It can also make it harder to debug where the sound is coming from at a given moment. A modification you can do is to also calculate a weighted average vector, measure its length, and place the audio source object that distance away from the listener. But for simplicity’s sake, I won’t reflect that in the sample code.
Variable size point samples
Now, it may be that not all the point samples in the point cloud should have a equally loud source volumes. So far I’ve glossed over what each point sample represents in the first place, so let’s go into that.
People familiar with point clouds in graphics may assume I’m covering surfaces densely in points, but my usage is much more restrained. For my water streams, I place point samples along the center only, spaced apart by almost the width of the water stream. For trees, I use one point sample per tree, or two for trees with very non-spherical crowns.
We could easily just specify a source volume for each point sample if we wanted, but I find it hard to know what I should set each source volume to. Instead I’ve designed my implementation around concepts of radius and area.
Each point sample has a radius, and its volume increases with the square of the radius. Why not the radius cubed? A sphere is a volume of space after all. But in practice it seems sensible to assume that the sound is emitted from a surface rather than a volume of space. In the case of a water stream, the sound comes from a flat surface, not a spherical volume. And in the case of a tree, leaves on many tree types are concentrated in a shell rather than uniformly filling a volume, since leaves inside the volume would get little sunlight.
For trees I set the radius such that it approximates the shape of the tree crown. For water streams, I take a different approach and calculate the area of the segment of water the point sample represents ( width * length ), calculate the radius of a disk of equivalent area ( sqrt(width * length * pi) ), and use that radius for the sample.
All volumes are multiplied with a multiplier value on the point cloud sound itself. You can use that to control the overall volume of the sound.
On the point cloud sound side of the implementation, I immediately calculate the sound volume corresponding to the radius whenever a new point sample is registered.
struct SoundPointSample {
    public Vector3 point;
    public float radius;
    public float volume;
}

List<SoundPointSample> samples;

public float multiplier;

public void AddSoundPointSample(Vector3 point, float radius) {
    float area = radius * radius * Mathf.PI;
    float volume = area * multiplier;
    SoundPointSample sample = new() {
        point = point,
        radius = radius,
        volume = volume
    };
    samples.Add(sample);
}
Then in the per-frame evaluation of contributions from each point sample, I multiply this source volume onto the calculated attenuated volume.
    // The weight is the attenuated volume.
    float weight = sample.volume * attenuation;
I also use the radius for another purpose. The attenuated volume we’ve used so far approaches infinity the closer we get to the center. But you’d never be able to get that "close" to a sound that’s distributed within a radius. Instead, we can decide that the volume should not increase any further once the listener gets inside the radius.
    float distanceAdjusted =
        Mathf.Max(distance, sample.radius);
    float attenuation = 1f / distanceAdjusted;

    // The weight is the attenuated volume.
    float weight = sample.volume * attenuation;
There are more elaborate formulas that could be used instead, but since the radius is just a crude approximation in the first place, there’s no reason to do anything particularly sophisticated with it.
Optimizations
So far, I’ve kept the logic and code as simple as I could to get the general ideas across, but for production code we should optimize things a bit.
There’s no reason to be able to hear every point sample from infinitely far away. We can decide on a max distance and save most of the calculations for point samples further away than that.
public float maxDist = 40f;
Since it’s cheaper to calculate the square distance than the distance itself, we can start by doing that, and then disregard all point samples whose square distance are larger than the squared max distance.
As for how to ensure the volume doesn’t mute abruptly when hitting the max distance, there’s various ways to do that, but my preferred one is to just subtract the would-be attenuated volume at that distance – which I call the threshold – from the attenuated volume in general.
float maxDistSqr = maxDist * maxDist;
float threshold = 1f / maxDist;

// Add up the volumes and directions.
for (int p = 0; p < samples.Count; p++) {
    SoundPointSample sample = samples[p];
    Vector3 dir = sample.point - mic;
    float distanceSqr = dir.sqrMagnitude;
    if (distanceSqr >= maxDistSqr)
        continue;

    float distance = Mathf.Sqrt(distanceSqr);
    Vector3 dirNorm = dir / distance;
    float distanceAdjusted =
        Mathf.Max(distance, sample.radius);
    float attenuation =
        Mathf.Max(0f, 1f / distanceAdjusted - threshold);

    // The weight is the attenuated volume.
    float weight = sample.volume * attenuation;
    if (weight == 0f)
        continue;

    cumulativeWeights += weight;
    cumulativeDirs += dirNorm * weight;
}
Another optimization is to divide the point samples up into multiple collections, each covering some spatial area. If you calculate the bounding box for each collection when registering it (remember to take the max distance into account), then you can greatly speed up the per-frame evaluation by skipping over collections where the listener is not inside the bounding box. Of course you could probably get more sophisticated with quadtrees, octtree, or other spatial data structures, but I like to keep things relatively simple.
Collections of point samples also map nicely to loading or procedurally generating chunks of the world on the fly, since each chunk can then be responsible for registering and unregistering its own point sample collection(s).
I won’t cover implementation of point sample collections here, as there’s nothing particularly novel or interesting about it.
Parametric sound
The technique covered so far is fully sufficient for straightforward use cases, and we’re now moving into optional territory.
As I mentioned at the beginning, one of my use cases is a water stream with water running at various intensities along it. Sometimes it even turns into a waterfall, and that sounds quite different from quietly running water.
Now, I could have simply used multiple point cloud sounds using different audio clips, and chosen one of those for each point sample along my water streams. But I like to think of water intensity as a continuous value rather than having to choose from a few discrete steps. For this reason, my point cloud sound implementation has support for parametric sound that works like this:
- Each point sample is created with a parameter value.
- In the point cloud sound object, it’s possible to specify multiple sound components.
- Each sound component has a different looping audio clip, as well as a curve that specifies its volume for a given parameter value. I use these curves such that they add up to one, basically cross-fading piece-wise from one component to the next as the parameter value increases.

The sound component class can look like this:
public class SoundComponent {
    public AudioClip clip;
    public AnimationCurve curve;
    public Color color; // For debugging.
    public PointCloudAudioSource source;
}

public SoundComponent[] soundComponents;
In order to avoid evaluating the curves for thousands of points each frame, we can precalculate this data at registration time instead. Basically, each point sample has a separate source volume per sound component. In my implementation, I store these as parallel arrays rather than keeping a tiny array inside each point sample.
struct SoundPointSample {
    public Vector3 point;
    public float radius;
    // No volume here.
}

List<SoundPointSample> samples;
List<float>[] sampleVolumesPerComp;

public float multiplier;

public void AddSoundPointSample(Vector3 point, float radius, float parameter) {
    float area = radius * radius * Mathf.PI;
    float volume = area * multiplier;
    SoundPointSample sample = new() {
        point = point,
        radius = radius,
    };
    samples.Add(sample);

    for (int c = 0; c < soundComponents.Length; c++) {
        SoundParametricData comp = soundComponents[c];
        float volPerComp =
            comp.curve.Evaluate(parameter) * volume;
        sampleVolumesPerComp[c].Add(volPerComp);
    }
}
The point cloud sound creates one audio source object per sound component. Some of the per-frame evaluations are shared between the components and others have to be done separately for each component.
float maxDistSqr = maxDist * maxDist;
float threshold = 1f / maxDist;

// Add up the volumes and directions.
for (int p = 0; p < samples.Count; p++) {
    SoundPointSample sample = samples[p];
    Vector3 dir = sample.point - mic;
    float distanceSqr = dir.sqrMagnitude;
    if (distanceSqr >= maxDistSqr)
        continue;

    float distance = Mathf.Sqrt(distanceSqr);
    Vector3 dirNorm = dir / distance;
    float distanceAdjusted =
        Mathf.Max(distance, sample.radius);
    float attenuation =
        Mathf.Max(0f, 1f / distanceAdjusted - threshold);

    for (int c = 0; c < soundComponents.Length; c++) {
        float volPerComp = sampleVolumesPerComp[c][p];

        // The weight is the attenuated volume.
        float weight = volPerComp * attenuation;
        if (weight == 0f)
            continue;

        cumulativeWeightsPerComp[c] += weight;
        cumulativeDirsPerComp[c] += dirNorm * weight;
    }
}

// Set volume, direction, spread for each component.
for (int c = 0; c < soundComponents.Length; c++) {
    float cumulativeWeights =
        cumulativeWeightsPerComp[c];
    var source = soundComponents[c].source;
    source.volume = cumulativeWeights;
    if (cumulativeWeights == 0f)
        continue;

    Vector3 averageDir =
        cumulativeDirsPerComp[c] / cumulativeWeights;
    float averageDirMag = averageDir.magnitude;
    source.position = mic + averageDir / averageDirMag;
    source.spread = Mathf.Clamp01(1f - averageDirMag);
}
Additional functionality
The above really is the gist of how the point cloud sound technique works, but you can tweak it in a lot of ways to suit your specific use cases and preferences. Here’s brief descriptions of a few tweaks I’ve done myself.
Directionality parameter
You can make the sound from a point cloud sound more or less directional by adding a directional parameter to it (default value: 1), and raise the spread value to the power of that directional value.
Spread affected by individual samples
The spread value we’ve calculated is based on how evenly balanced the sample directions are around the listener. But you could argue that even when only a single sample is active, the spread should also increase as the listener approaches and moves inside the radius of that one sample. You can easily achieve this by changing the calculation of the normalized direction to this:
Vector3 dirNorm = dir / (distance + sample.radius * 0.5f);
This will shorten the dirNorm vector (which is no longer actually normalized) the closer the listener is to it, making the spread correspondingly larger. At ten times the radius, the spread is 0.05, at twice the radius it’s 0.2, at the radius it’s 0.33, at half the radius it’s 0.5, and at the center it’s 1.0.
Final volume tweak parameters
The covered implementation has a multiplier value for controlling the overall volume, but you may additionally want to add a parameter to control the final volume, applied after the calculated average volume has already been clamped between zero and one. This is equivalent to adjusting the volume inside the audio clip itself, but is easier to tweak quickly. If you have implemented sound components, you can specify this final volume parameter per component.
Volume function for parametric sounds
For my water use case, where a sample’s parameter value indicates intensity, I needed the samples with higher parameter values to not only use different audio clips, but also generally be louder.
I implemented this with a volume function that follows an exponential curve, but it could also use a user-defined curve (AnimationCurve in Unity) or similar. For each sample, the volume function is evaluated based on the sample’s parameter value. The result is multiplied onto each of the sample’s precalculated per-component volume values.
Debug visuals
To be able to efficiently debug your point cloud sounds, you may want to implement debug visuals for where the point samples are, what their radii are, and – for parametric sounds – what a sample’s calculated volume is for each sound component.
You can also create visualizations for where each final audio source object is located, and what its volume and spread is (as shown in the video at the beginning of this article).
Collision sounds
Like I mentioned in the beginning, I also use my point cloud sound technique for collision sounds when the player moves through foliage like bushes and tree crowns.
This works in quite a different way from what we’ve covered so far, and is a slightly less obvious use case, since the player will usually collide with only one or two samples at a time. But if you already have a point cloud sound setup for other use cases anyway, it’s nice and easy to use it for this additional purpose too. In my case, I already had a point cloud sound for rustling leaves that I could then use for foliage collisions too.
Collision sounds could be implemented in many ways, but in my case it works like this:
- Sound components have a checkbox to control if it’s a collision sound.
- Sound components have a speedThreshold parameter (used only for collisions) to specify at which speed the player must move before the collision sound starts to take effect. It reaches full effect at twice this speed in my implementation, but this could alternatively be an additional parameter.
- For collision sounds, instead of using the normal attenuated volume in the per-frame evaluation, the volume goes from zero at the radius to one at the center, multiplied with the player speed based multiplier. This value is clamped between zero and one.
- For collision sounds, the player’s distance to the sound is no longer merely the distance to the listener point. Instead it’s calculated as the shortest distance to a line segment representing the player’s body. This is in order to also trigger collisions from the player’s feet and body, and not just from the head.
As you might be able to tell, there’s a lot of somewhat arbitrary choices in that implementation, and your collision use cases might call for different choices.
I hope you found this useful or interesting
Let me know if you do something with point cloud sounds, especially if it’s for different use cases than mine, or doing things in a different way!
Notes on atmospheric perspective and distant mountains
I don't know if it's because I come from a supremely flat country, or in spite of it, but I love terrain with elevation differences. Seeing cliffs or mountains in the distance fills me with a special kind of calm. The game I'm currently working on, The Big Forest, is full of mountain forests too.
I've just returned from three weeks of vacation in Japan, and I had ample opportunities to admire and study views with layers upon layers of mountains in the distance. And while studying these views, something about the shades of mountains at different distances clicked for me that’s now obvious in retrospect. I'll get back to that.
Note: No photos here have any post-processing applied, apart from what light processing an iPhone 13 mini does out of the box with default settings. I often looked at the photos right after taking them, and they looked pretty faithful to what I could see with my own eyes.


The blue tint of atmospheric perspective
A beautiful thing about mountains in the far distance is how they appear as colored shapes behind each other in various shades of blue. Sometimes it looks distinctly like a watercolor painting.

In an art context, the blue tint that increases with distance is called aerial perspective or atmospheric perspective (Wikipedia).
I've tried to capture this in The Big Forest too by making things more blue tinted in the distance. In terms of 3D graphics techniques, I implemented it by using the simple fog feature which is built into Unity and most other engines. By setting the fog color to blue, everything fades towards blue in the distance. It can produce a more or less convincing aerial perspective effect. Using fog for this purpose is as old as the fog feature itself. The original OpenGL documentation mentions that the fog feature using the exponential mode "can be used to represent a number of atmospheric effects", implying it's not only for simulating fog. For our purposes, let's call it the fog trick.

Which color does things fade towards?
I long held a misconception that things in the distance (like mountains) get tinted towards whatever color the sky behind them has. In daytime when the sky is blue, the color of mountains approach the same blue color the further away they are. At sunset where the sky is red, the mountains approach that red color too. A hazy day where the sky is white? The mountains fade towards white too.
Of course, the sky is not a single color at a time. Even at its blueest, it's usually more pale at the horizon than straight above.
This raises a dilemma when using the fog trick. Set the fog color too close to the blue sky above, and the distant mountains appear unnatural near the pale horizon. But set the fog color to the pale color of the sky at the horizon, and the result is even worse: Some mountain peaks may then end up looking paler than the sky right behind them, and that looks very bad, since it never happens in reality.

For a long time I wished Unity had a way to fade towards the skybox color (the color of the sky at a given pixel) rather than a single fixed color.
In practice, it's not too difficult to settle on a compromise color which looks mostly fine. It's just still not ideal, for reasons that will become clear later.
Are more distant mountains more pale?
Now, while I was tweaking the fog color in my game and in general contemplating atmospheric perspective, I could see from certain reference photos I'd found on the Internet that mountains look paler at great distances. Not just paler than their native color – green if covered in trees – but also paler than the deep blue tint they appear with at less extreme distances.
This was counter-intuitive. How could the atmosphere tint things increasingly saturated blue up to a certain distance, but less saturated again beyond that point? Now, the thing is, you never know how random reference photos have been processed, and which filters might have been applied. For a while, I thought it simply came down to tone mapping.
Tone mapping is a technique used in digital photography and computer graphics to map very high contrasts observed in the real world (referred to as high dynamic range) into lower contrasts representable in a regular photograph or image (low dynamic range). For context, the sky can easily be a hundred times brighter than something on the ground that's in shadow. Our eyes are good at perceiving both despite the extreme difference in brightness, but a photograph or conventional digital image cannot represent one thing that's a hundred times brighter than another without losing most detail in one or the other.
If you try to take a picture with both sky and ground, the sky may appear white in the photo even though it looked blue to your eyes. Or if the sky appears as blue in the photo as it did to your eyes, then the ground may appear black. Tone mapping makes it possible to achieve a compromise: The ground can be legible while the sky also appears blue, but it's a paler blue in the photo than it appeared to your eyes. Tone mapping typically turns non-representable brightness into paleness instead.
So I thought: Distant mountains approach the color – and brightness – of the sky, so they may appear increasingly pale in photos simply because they're increasingly bright in reality, and the brightness gets turned into paleness by tone mapping.
However, while observing distant mountains with my own eyes on the Japan trip, it became clear that this theory just doesn't hold up.
Revised theory
Some of my thinking was partially true. Distant mountains do take on the color of the sky, just in a bit different way than I thought. And tone mapping does sometimes affect the paleness of the sky and distant mountains.
But on this trip I had ample opportunity to study mountains layered at many distances behind each other. I could observe with my own eyes (no tone mapping involved) that they do get paler with distance. (It's not that I've never seen mountains in the distance with my own eyes before, but on previous occasions I guess I didn't think very analytically about the exact shades.) Furthermore I've taken a lot of pictures of it, where (unlike random pictures I find on the Internet) I've verified that the colors and shades look about the same in the pictures as they looked to my eyes in real life.

So here's what finally clicked for me:
Mountains transition from a deep blue tint in the mid-distance to a paler tint in the far distance for the same reason that the sky is paler near the horizon.
To the best of my current understanding, the complex scientific reason relates to how Rayleigh scattering (Wikipedia) and possibly Mie scattering (Wikipedia) interact with sunlight and the human visual system, but the end result is this:
As you look through an increasing distance of air (in daytime), the appearance of the air changes from transparent, to blue, to nearly white. (Presumably this goes through a curved trajectory in color space).
- When you look at the sky, there's more air to look through near the horizon than when looking straight up, so the horizon is paler.
- Similarly, there's also more air to look through when looking at a more distant mountain compared to a less distant one, so the more distant one is paler.
A small corollary to this is that the atmospheric tint of a mountain can only ever be less pale than the sky immediately behind it, since you're always looking through a greater distance of air when looking just past the mountain than when looking directly at it.
This can be generalized, so it doesn't only work at daytime, but for sunsets too: Closer mountains are tinted similar to the sky further up, while more distant mountains are tinted similar to the sky nearer the horizon. In practice though, it's hard to find photos showing red-tinted mountains; much more common are blue-tinted mountains flush against the red horizon. Possibly the shadows from the mountains at sunset play a role, or perhaps the distance required for a red tint is so large that mountains are almost never far enough away.
I sort of knew the part about the horizon being paler due to looking through more air, but for some reason hadn't connected it to mountains at different distances. In retrospect it's obvious to me, and I'm sure lots of the readership of this blog were well aware of it, and find it amusing that I only found out about it now. On the other hand, I can also see why it eluded me for a long time:
- It's just not intuitive that a single effect fades things towards one color or another depending on the magnitude.
- It's hard to find good and reliable reference photos, and unclear how to interpret them given the existence of filters and tone mapping.
- The Wikipedia page on aerial perspective doesn't mention that the color goes from deeper blue to paler blue with distance. You could read the entire page and just come away with the same idea I had, that aerial perspective simply fades towards one color.
- If you go deeper and read the Wikipedia pages on Rayleigh scattering and Mie scattering, they don't mention it either. The one on Rayleigh scattering has a section about "Cause of the blue color of the sky", but it doesn't mention anything about the horizon being paler.
In fact, I've not yet found any resource that is explicit about the fact that the color of increasingly distant mountains go from deeper blue to paler blue. It's even hard to find any references that explain why the sky is paler near the horizon, and the random obscure Reddit and Stack Exchange posts I did find did not agree on whether the paleness of the horizon is due to Rayleigh scattering or to Mie scattering.
I found and tinkered with this Shadertoy, and if that's anything to go by, the pale horizon comes from Rayleigh scattering, while Mie scattering primarily produces a halo around the sun. I don't know how to add mountains to it though.
All right, that was a lot of text. Here's another nice photo to look at:

I'm still not really certain of much, and you should take my conclusions with a grain of salt. I haven't yet found any definitive validation of my theory that mountains are paler with distance for the same reason the horizon is paler; it's just my best explanation based on my observations so far. I find it somewhat strange that it's so difficult to find good and straightforward information on this topic (at least for people who are not expert graphics programmers or academics), but perhaps some knowledgeable readers of this post can shed additional light on things.
One thing is pretty clear: An accurate rendition of atmospheric perspective (at great distances) cannot be achieved in games and other computer graphics by using the fog trick, or other approaches that fade towards a single color. I haven't yet researched alternatives much, but I'm sure there must be a variety of off-the-shelf solutions for Unity and other engines. I've learned that Unreal has a powerful and versatile Sky Atmosphere Component built-in, while Unity's HD render pipeline has a Physically Based Sky feature, which however seems problematic according to various forum threads. If you have experience with any atmospheric scattering solutions, feel free to tell about your experience in the comments below.
It's also worth noting though that the distances at which mountains fade from the deepest blue to paler blue colors can be quite extreme, and may not be relevant at all for a lot of games. Plenty of games have shipped and looked great using the fog trick, despite its limitations.
Light and shadow
Let's finally move on from the subject of paleness, and look at how light and shadow interacts with atmospheric perspective.
Here are two pictures of the same mountains (the big one is the volcano Mount Iwate) from almost the same angle, at two different times. In the first, where the mountain sides facing the camera are in shadow, the mountains appear as flat colors. In the second you can see spots of snow and other details on the volcano, lit by the sun. The color of the atmosphere is also a deeper blue in the second picture, probably due to being closer to midday.


And here's a picture from Yama-dera (Risshaku-ji temple), where the partial cloud cover lets us see mountains in both sunlight and shadow simultaneously. This makes it very clear that mountain sides at the same distance appear blue when in shadow and green when in light. The blue color of the atmosphere is of course still there in the sunlit parts of the surface, but it's owerpowered by the stronger green light from the sunlit trees.

That's all the observations on atmospheric perspective I made for now. I would love to hear your thoughts and insights! If you'd like to see more inspiring photos from my Japan trip (for example from a mystical forest stairway), I wrote another post about that.
Resources for further study
Here are links to some resources I and others have come across while looking into this topic.
From my perspective, these resources are mostly to get a better understanding of the subject, and the theoretical possibilities. In practice, it's not straightforward to implement one's own atmospheric scattering solution in an existing engine. Even in cases where the math itself is simple enough, the graphics pipeline plumbing required to make the effect apply to all materials (opaque and transparent) is often non-trivial or outright prohibitive for people like me, who aren't expert graphics programmers.
- A simple improvement upon single-color fog is to use different exponents for the red, green, and blue channel. This can be used to have the tint of the atmosphere shift from blue to white with distance. There's example shader code for it in this post by Inigo Quilez, though unfortunately it lacks images illustrating the effect. The post also covers how to fade towards a different color near the sun, and other effects.
- Here's a 2020 academic paper, video and code repository for the atmospheric rendering in Unreal, and here's the documentation.
- Here's the documentation for Unity's Physically Based Sky.
- A 2008 paper that gets referenced a lot is Precomputed Atmospheric Scattering by Bruneton and Neyret, with code repository here. Unity's solution is based on it, and it's cited and compared in Unreal's paper.
Procedural creature progress 2021 - 2024
For my game The Big Forest I want to have creatures that are both procedurally generated and animated, which, as expected, is quite a research challenge.
As mentioned in my 2024 retrospective, I spent the last six months of 2024 working on this – three months on procedural model generation and three months on procedural animation. My work on the creatures actually started earlier though. According to my commit history, I started in 2021 after shipping Eye of the Temple for PCVR, though my work on it prior to 2024 was sporadic.
Though the creatures are still very far from where they need to be, I'll write a bit here about my progress so far.
The goal
I need lots of forest creatures for the gameplay of The Big Forest, some of which will revolve around identifying specific creatures to use for various unique purposes. I prototyped the gameplay using simple sprites for creatures, but the final game requires creatures that are fully 3D and fit well within the game's forest terrain.

2024 retrospective
Another year went by as an indie game developer and what do I have to show for it?
In last year's retrospective I wrote that apart from working on my game The Big Forest in general, I had four concrete goals for 2024:
- Present my Fractal Dithering technique
- Release my Layer-Based ProcGen for Infinite Worlds framework as open source
- Wrap up and release The Cluster as a free experimental game
- Make better use of my YouTube channel
I ended up doing only two of those, but it was the two most important ones to me, so I'm feeling all right with that.
Release of LayerProcGen as open source
I released my LayerProcGen framework as open source in May 2024. LayerProcGen is a framework that can be used to implement layer-based procedural generation that's infinite, deterministic and contextual.

I wrote extensive documentation describing not only the specifics of how to use it, but also the overarching ideas and principles it's based on. I also did a talk at Everything Procedural Conference about it, which was well received.
Procedural game progression dependency graphs
In 2022 I came up with some new ideas for what kind of game The Big Forest (working title) could be. During the year, I developed a way to procedurally create dependency graphs and also procedurally create fully playable game levels based on the graphs.

The Cluster is now released
The Cluster is finally released and available for free on Itch. It's a 2.5D exploration platformer set in an open world that's carefully procedurally planned and generated, and does a few interesting things I haven't yet seen in other games (check out the links for more info).

Here's a trailer:
My last blog post about The Cluster was in 2016 and titled "Development of The Cluster put on hold", and by that I meant put on hold indefinitely.
2023 retrospective and goals for the new year
2023 was a pretty good year for me!
I'll touch here briefly on my personal life, then go on to talk about the Quest 2 release and sales of Eye of the Temple, and finally talk about my new game project and goals for 2024.
Personal life
It's the first year since the pandemic that didn't feel affected by it. I moved from Denmark to Finland in 2020, just as the pandemic began, so on the social side it was some slow years initially.
Things picked up in 2022, but especially in 2023 we had lots of family and friends from Denmark visit us here and have a great time, and we also made more strides on the local social network front.
Particularly memorable was a wonderful weekend celebrating the 40th birthdays of me and a friend, with some of my closest family and friends from Denmark and Finland at a site called Herrankukkaro in the beautiful Finnish archipelago.
Eye of the Temple released on Quest and turned a profit
In April 2023, a year and a half after the original PC release on Steam, my VR game Eye of the Temple was finally released for Quest 2, with the help of Salmi Games. While it was super tough getting there, in the end we managed to ship the game at a level of quality I'm very proud of. Others agreed; it got a great critical reception, as well as a high user rating of 4.7 out of 5 stars.
It's super gratifying regularly seeing new reviews of the game from people who say it's the best VR experience they've had. Oh, and recently, UploadVR ranked it the 5th best game for Quest 3 and Screen Rant ranked it the 6th best game for Quest 2. Wow, what an achievement for my little game! (But remember, critical acclaim does not equal sales…)
I’m no longer working on the game at this point. After being occupied with it over a span of seven years, I really want to move on, and I'm also done with VR in general for now. But the sales of the game are still developing, so let's talk a bit about that.
My thinking about the game’s sales performance has changed a lot over time. I didn't pay myself a regular salary during the game’s three years of full time work. But when evaluating the game financially, I use the old salary from my previous job as reference, and calculate whether my time investment at that salary (I’ll refer to it as just “my investment”) would be covered retroactively by the game’s revenue. Of course, I also keep in mind that the covered percentage would be higher if I based it on a more moderate salary.
I was initially slightly disappointed in the Steam sales. As I wrote about back in November 2021, the projected year one sales would only cover 25% of my investment. Back then I expected the Steam year one revenue to make up the majority of the game's lifetime revenue. One year later, the sales had outperformed that projection, and my investment was actually covered 40%.
A lot has happened since then, in particular due to the Quest launch.
Comments from many VR developers in 2021 and 2022 had indicated that Quest sales could commonly be 5x-10x as large as Steam VR sales. For Eye of the Temple, the Quest week one revenue was merely twice of what the Steam week one revenue had been, so it was not quite as high as Salmi Games and I had hoped for. Speaking with other VR developers in 2023, it seems that the time when Eye of the Temple launched on Quest was generally a bad period for Quest game sales.
Still, Quest is easily the most important VR platform, and later the sales picked up significantly, with the recent Black Friday and Xmas sales combined having as big an impact on revenue as the launch sales. Already, 70% of total revenue has come from Quest and 30% from Steam, with the Quest version having been out for a shorter time.

My investment is now covered 140%. In other words, even based on a proper salary for myself that's fitting for my experience, Eye of the Temple has recently flipped well into profitability. That still doesn't make it a runaway hit, but it's really nice to know that it's a success not only creatively and as a passion project, but also in terms of financial sustainability. Back in 2020 when I was still developing the game, I had not expected that at all for my first commercial title.
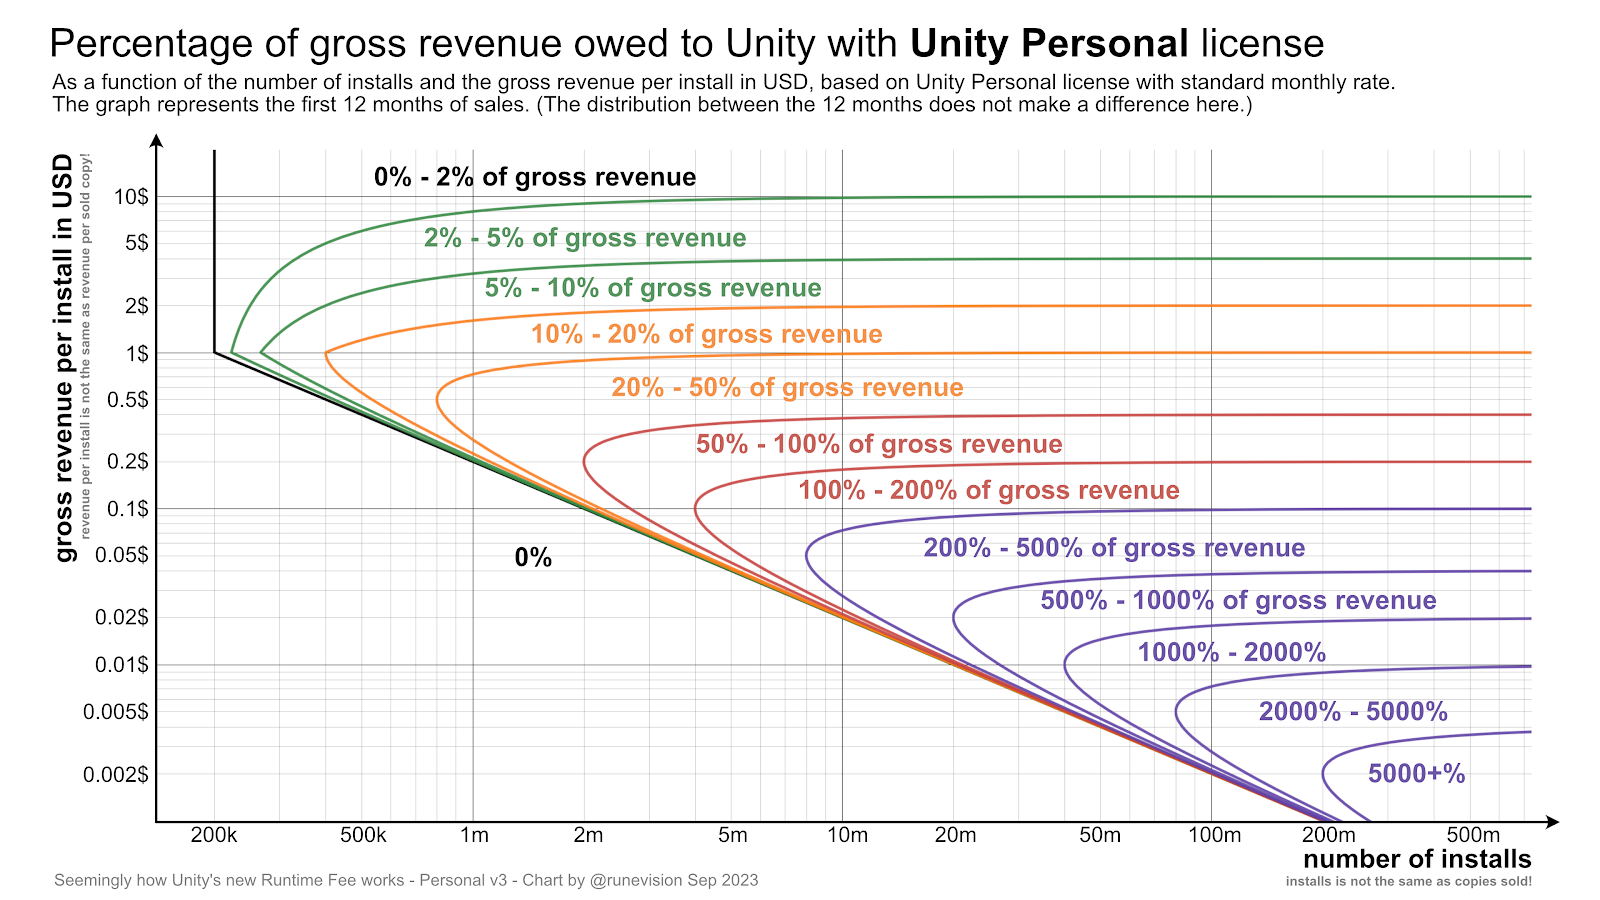
Charts to visualize how much you owe Unity for their per-install Runtime Fee
Unity Technologies has announced a new Unity Runtime Fee that charges developers a fee of up to $0.20 per installed game above certain thresholds. According to my calculations, it can be a bankruptcy death-trap, at least in certain cases.
Shockingly, the owed percentage is unbounded to the point that the owed amount can exceed gross revenue, since it depends on installs, not sales.
Update 1: Unity since backtracked and apologized for the announced changes. With the new updates to the terms, Unity will clamp the install fees to be at maximum 2.5% of revenue. And the changes will not be retroactive after all. Furthermore, John Riccotello is stepping down as CEO. There are more details in the linked blog post.
Update 2: About a year later, Unity canceled the runtime fee altogether. Good.
Nevertheless, Unity has suffered a tremendous decrease in trust and goodwill, which already was not great before. With the cancellation, there is less urgency for developers to switch to a different engine, but the whole situation has highlghted the importance of being prepared for such a scenario and have eyes and ears open towards other engines as well.
The original post continues below.
You can check out the specifications in their blog post. Based on those, I've made two charts where you can look up how big a percentage of your gross revenue you would owe Unity, based on the number of installs and on how much revenue you make for each of those installs. The fee specifications are different for Unity Personal and Unity Pro, so there is a chart for each.
Behind the design of Eye of the Temple
My VR adventure Eye of the Temple, that I've been working on since 2016, has landed on the Meta Quest 2! It was released last week on April 27th.
Get Eye of the Temple for Quest 2 on the Oculus Store
Originally released for SteamVR in October 2021, so many people have asked for it to be brought to the Quest 2 as a native app, so I'm happy it's finally a reality. The Quest 2 version was co-developed with Salmi Games and it took all our combined and complimentary skills to bring the game to life at target framerate on the Quest 2 mobile hardware.
We also made this new trailer:
The game got a fantastic reception! UploadVR called it "A Triumphant Room-Scale Adventure" and has labeled it an essential VR experience, and it got great video coverage by Beardo Benjo, BMFVR and many others. It also got great user reviews and a high review score on the Oculus Store.
Behind the design
To mark the Quest 2 launch of Eye of the Temple, I've written no less than three articles - published elsewhere - about different aspects of its design.
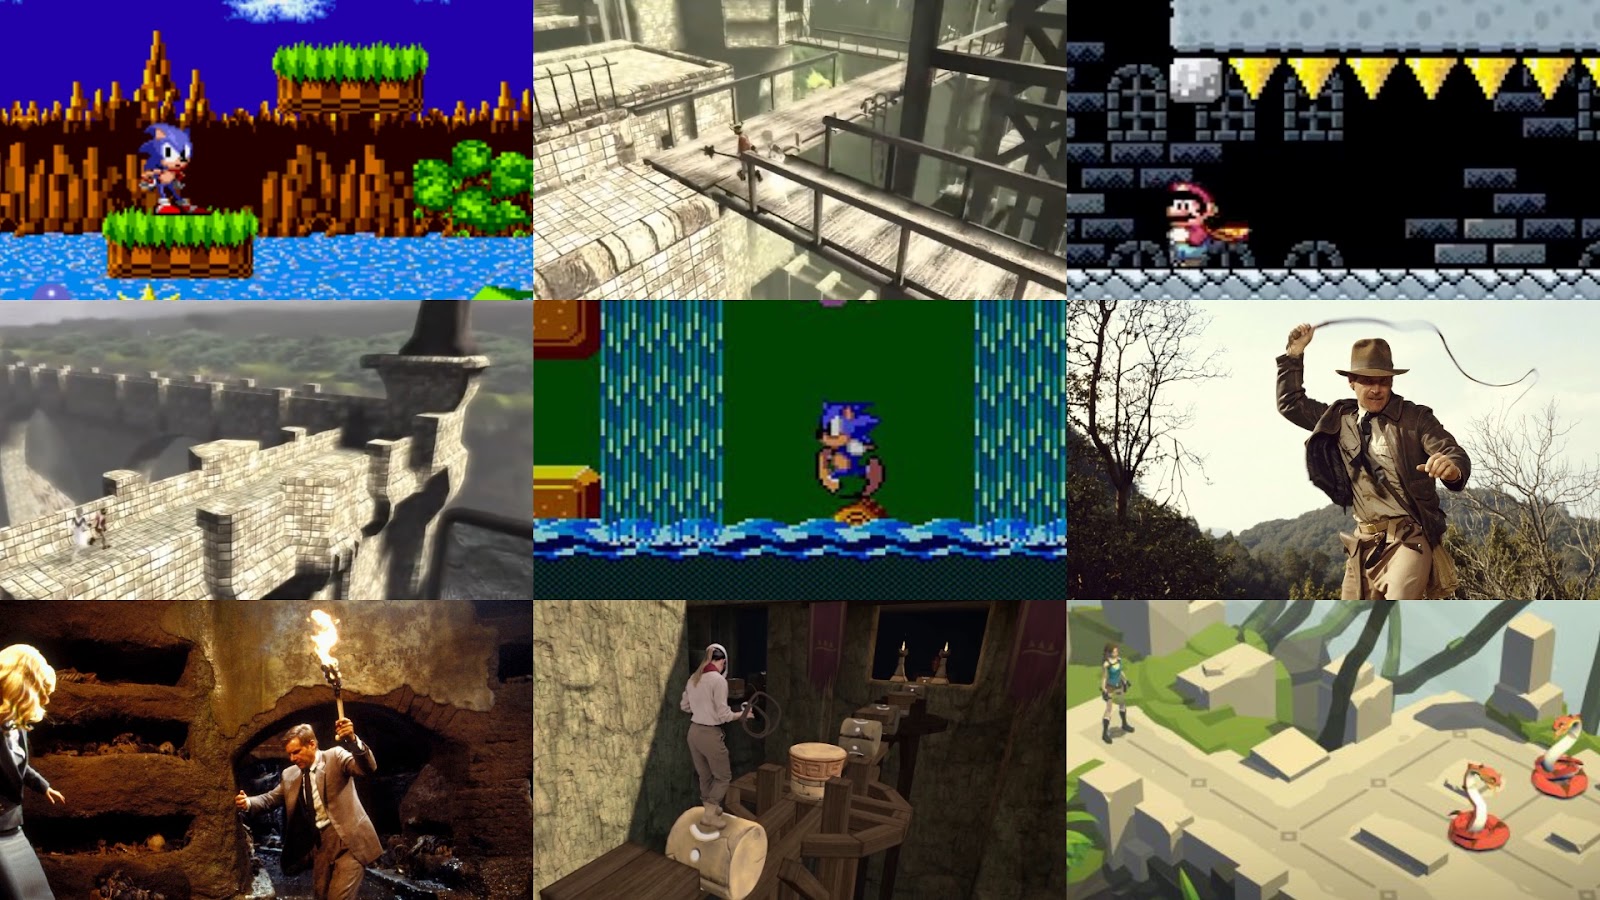
The Origins and Inspirations of ‘Eye of the Temple’
To celebrate the launch, I spoke with Meta about the origins of Eye of the Temple and the wide variety of inspirations (from classic platformers to Ico and Indiana Jones) behind the game.
Read the article on the Meta Quest blog
One year later...
Today is the one year anniversary of the release of my VR adventure Eye of the Temple on Steam! It's currently 40% off to celebrate.
I thought I'd take a moment to talk about what I've been up to since the release, both related to Eye of the Temple and other projects.
My experience launching Eye of the Temple
My VR adventure Eye of the Temple, that I've been working on for the past five years, has finally shipped! It was released last month on October 14th.
Naturally this was a huge milestone for me after having worked on it for so long. And while I've released some smaller games for free in the past, Eye of the Temple is my commercial debut game. I actually did it! Wow, I say, patting myself on the back.

Designing for a Sense of Mystery and Wonder

I play games to get to explore intriguing places, while challenge and story is secondary to me. But there still has to be a point to the exploration. I don’t want to just wander around some place - I want to uncover something intriguing and ideally mysterious. But the mystery lies not in the uncovering; it lies in the anticipation, or rather the lack of knowing exactly what I might find. In this article I examine that sense of mystery and wonder that’s tied not to story or themes, but to exploration. I’ll be using the word mystery as a shorthand for the kind of mystery and wonder I’m talking about here.
Zelda: Breath of the Wild from 2017 is an amazing game to go explore in, and one of my all time favorites. That said, while there are many things in the game that exude a sense of mystery - and certainly more so than in the average open world game - there are also a lot of missed opportunities.

I’ll compare Zelda: Breath of the Wild (BOTW) with Zelda: A Link to the Past (ALTTP) to try to figure out why ALTTP has a stronger sense of mystery than BOTW. A Link to the Past is a much older Zelda game from 1991 but I first played it in 2019.
Along the way I’ll be extracting four key design strategies for evoking a greater sense of mystery, and apply those strategies in the form of proposed design changes to BOTW. Finally, I’ll touch on some more general considerations to keep in mind when designing for a sense of mystery and wonder in general.
Goodbye Unity
Today is my last day at Unity.
It's been nearly 12 years since I joined the then-tiny startup with ~20 employees. Now there's over 3000 and it's been quite the ride to be part of this company while it has evolved, especially with the big role it has had in evolving the whole game industry too.
Lately I've been longing to do something smaller again, and so it's time for a new adventure in my work life to begin. Starting next week, I'm a full time indie developer!

For a start I'll be wrapping up my VR action-adventure game Eye of the Temple that I've been working on part time for the past 4 years. There's a demo on Steam already that has very positive reviews and I expect the full game can ship in early spring 2021.
What I'll do after is not fully settled yet, but I have an idea for a (non-VR) game set in a big forest full of ruins, strange artifacts, pathways and mysteries that I might begin working on next year.
My mental state at the moment is kind of a mixed bag. On the one hand I'm very excited about future possibilities and being able to work on exactly what I want. On the other, my motivation and productivity is a bit flaky these days. I don't know the exact reasons, but possibilities could include:
- Uncertainty about what my everyday life will be like (though economically I'll be fine!).
- Having felt unfulfilled work-wise for a good while before I quit.
- Having moved to a new country this summer (from Denmark to Finland), in the middle of a pandemic where it's hard to meet new people.
- Being in the end stretch of developing a game where it's mostly boring stuff left.
- Dark winter setting in - that normally doesn't affect me much but could be a compounding factor still.
However, I'll go easy on myself and just accept my productivity and motivation not being at its greatest right now. Perhaps I won't hit the ground running in my new indie life, but that's okay. I didn't have that much vacation this year either, so I'll see this as a chance to take it a bit easy for a little while while I adjust to my new life.
All in all, not a bad place to be, and I'm excited about the future!
Eye of the Temple in 2019
I've completely failed to keep up the posting in 2019, but it's not too late to write at least one post this year! Here's (almost) everything that happened with the development of Eye of the Temple in 2019!

But first, let's look at what happened in the last part of 2018 after the previous post.
Creaking Gorge and The Cauldron
Since my last post in July where I finally got a vision down for the level design in Eye of the Temple, I've been feeling super productive adding new areas and features to the game.
In August I added two new areas and in September I've been revamping the in-game UI and the speedrun mode. Only problem is I haven't kept up with these blog posts. To avoid this post getting too long, I'll cover the new areas here and save the UI work for a later post.
Creaking Gorge
Creaking Gorge is an area where you move along and into cliff sides and atop wooden scaffolding. It's by far the most vertical area in the game, spanning more than 50 meters vertically.

Level design workflows
Let me talk a bit about my workflows for doing level design in Eye of the Temple since I recently had some progress in that area.
I've been in something akin to a level design writer's block for a long time, being able to rework individual small areas, but unable to start the major world redesign that I've been intending for over a year.
Maybe calling it writer's block is pretentious - the fact is that I've never done this sort of work before, so I may just not have developed the necessary workflows to deal with it. Anyway, I think I might have finally cracked the nut.
I've had plenty of ideas, but fragmented and not crystallized enough to get down on paper. How do you start planning a non-linear world meant to be highly interconnected and interdependent? I can talk about what eventually worked for me.
I've long pondered what type of document could help me get ideas down on paper in a quick way. In addition to text documents (glorified to-do lists) I've been using tilemaps for sketching level designs.
I've been experimenting with using Unity Tilemaps as a digital replacement for pencil level design sketches. Some success so far, although I'm really missing rotation/flipping of selection and proper multi-selection.
— Rune Skovbo Johansen (@runevision) November 27, 2017

New pots feature, mixed reality, Discord server, Yonderplay event
It's time for a new update on the development of Eye of the Temple.

Events
GDC in March is well behind us and I had a great time there. Among other things, I got to show off Eye of the Temple at the European Game Showcase (and saw a lot of other cool games too). This was a private event for specially invited people from the network of the organizers.
Now, Eye of the Temple has been selected for Yonderplay, an event that's part of the Nordic Game Conference in Malmö in Sweden and open to everyone at the conference. This will go down on May 25, the last day of the conference. This is the most public showing of the game yet, and I'm very excited about it! If you'll be at Nordic Game Conference yourself, come by and say hi and give the game a try.

New trailer, public Steam page and Eye of the Temple in the press!
Last week I took a dive into the world of PR with Eye of the Temple.
There is a new trailer you can see on the website eyeofthetemple.com or right here below.
And Eye of the Temple now has a Steam page: Eye of the Temple on Steam
If you have a Vive or Oculus Rift, and think Eye of the Temple looks interesting, you can totally add it to your wishlist on Steam now! ;)
After that I took my first stab at contacting the press with a press release. The story got picked up by UploadVR and a handful of smaller outlets (see list on the Sanctum Dreams website). Considering I'm an unknown small indie developer with no experience with the press, I'm pretty happy with the results.
This week I'm at Game Developers Conference in San Francisco. I'm mostly here with Unity, but I'll also be showing Eye of the Temple at the European Game Showcase.
Exciting times!
January 2018 update
It seems like I didn't blog since July. How scandalous! Well, here's an update on what I worked on for Eye of the Temple since then.
Presented as a series of tweets, because that's what I have time for.
Note: Add blockers seem to sometimes randomly block some of the embedded tweets for some reason.
Prettier background environment
The cold snowy mountains didn't give the feeling I was aiming for. Failing to find anything ready-made that fit the bill, I created my own lush, mountainous environment.
What do you think of this new environment art for the backdrop of the temple that we've been working on? #gamedev #indiedev #VR #HTCvive pic.twitter.com/ASGxGCeG3p
— Eye of the Temple (@eyeofthetemple) September 20, 2017
Another shot of the mountains surrounding the temple. #screenshotsaturday #gamedev #indiedev #VR #HTCvive #madewithunity pic.twitter.com/GmfAwyzPvp
— Rune Skovbo Johansen (@runevision) September 23, 2017
Failed attempts at mixed reality capture with StereoLabs ZED stereo camera
I think a mixed reality video would be the ideal way to show off Eye of the Temple, so I invested a bit in this. Unfortunately it didn't go well due to a combination of a bad choice of immature tech, and an insufficient green-screen setup. I might revisit this in the future though.
@stereolabs3D Could you show how this 3D printed mount is meant to be used with a Vive controller and tracker respectively? pic.twitter.com/UqoEm0E77v
— Rune Skovbo Johansen (@runevision) September 16, 2017
It's designed to hold a Vive controller, a tracker and even an oculus touch. pic.twitter.com/yc4fC2J5ZJ
— Stereolabs (@Stereolabs3D) September 16, 2017
I posted a video here with my troubles. See tracking issue at 8:04. I mailed your support with more details. https://t.co/DCk6KeRO0O
— Rune Skovbo Johansen (@runevision) September 23, 2017
Argh! Mixed reality recording is hard! #VR #mixedreality #HTCVive #indiedev pic.twitter.com/YWVH6oFgc9
— Rune Skovbo Johansen (@runevision) September 26, 2017
Glowy light for certain platforms
Any Unity shader experts who might know why I get heavy banding on alpha of frag function output on Windows (but not Mac)? pic.twitter.com/Xrq8CliYNo
— Rune Skovbo Johansen (@runevision) October 16, 2017
I made a spiky glow for this platform. Helps a bit with awareness of edges without having to look down all the time. #VR #gamedev #indiedev pic.twitter.com/I9ScvbmzZL
— Rune Skovbo Johansen (@runevision) October 17, 2017
New build for testers with whip and other improvements
I finally finished developing the whip and got a build out to the testers.
Trying to recruit people to test the speedrun mode (never had any luck!)
The speedrun mode is super fun and challenging to me, but nobody else seem interested in it. Besides asking on twitter I also contacted some of the notable VR speedrunners and people who has posted about VR speedrunning on Reddit, but got nothing out of it. If anyone reading this have a Vive and would like to try it, do let me know!
#speedrunning in #VR with #HTCVive? Anyone want to give the speedrun mode of @eyeofthetemple a go? https://t.co/6g2WSQ2jnT pic.twitter.com/MtVtMKdLC0
— Rune Skovbo Johansen (@runevision) October 26, 2017
Implemented a new type of dangerous rooms for the temple
The reviews for this feature are through the roof.
Watch out! Working on a new type of danger in @eyeofthetemple... #screenshotsaturday #gamedev #indiedev #VR #HTCVive pic.twitter.com/95uYeL3b86
— Rune Skovbo Johansen (@runevision) October 28, 2017
It's getting tight in here. @eyeofthetemple #screenshotsaturday #gamedev #indiedev #VR #HTCVive pic.twitter.com/Tvrd3OcWk2
— Rune Skovbo Johansen (@runevision) October 28, 2017
"What do you mean I have to get in there!?" New room in @eyeofthetemple #screenshotsaturday #gamedev #indiedev #VR #HTCVive pic.twitter.com/7lE2iqorVD
— Rune Skovbo Johansen (@runevision) October 28, 2017
Got serious working on the big level design overhaul
Still far from finished with this one.
I've been experimenting with using Unity Tilemaps as a digital replacement for pencil level design sketches. Some success so far, although I'm really missing rotation/flipping of selection and proper multi-selection. pic.twitter.com/jT2PZloAYE
— Rune Skovbo Johansen (@runevision) November 27, 2017
I'm using #unity3d tilemaps for level design planning of multi-story structures. Moving things around becomes a pain though; having to do it separately for each layer. Any better alternatives? pic.twitter.com/STSb8AarvB
— Rune Skovbo Johansen (@runevision) December 29, 2017
Worked on a texture tool "Bricker" to easily create bricks and carved shapes
I've been continuing refining my tool for generating textures+normals from simple color masks. Output quality is getting there... #gamedev pic.twitter.com/jWzCUdc6Oz
— Rune Skovbo Johansen (@runevision) December 11, 2017
More on that in another post.
Contracted a few pieces of concept art to get inspiration for improving the visual look of the game
I've had decent progress towards realizing the concept art vision for @eyeofthetemple. I'll put further work on that on hold for now and focus again on a level design overhaul. #gamedev #indiedev #screenshotsaturday #VR #HTCvive pic.twitter.com/csUc4C5o7p
— Rune Skovbo Johansen (@runevision) December 23, 2017
And finally, introduced this little birdy
Bird spotted by the temple. #gamedev #indiedev #VR #HTCVive #birds pic.twitter.com/x8W7IRm54g
— Rune Skovbo Johansen (@runevision) January 15, 2018
That's it for now. Hope you enjoyed this glimpse into the development, and see you soon. Back to working on the game for me!
Remember you can also follow the development as it happens following @EyeOfTheTemple or @runevision on twitter.