Supercharging my procedural mountain forest
I've published a new video about how I've made my procedural mountain forest bigger, better and faster over the past two years:

Links to things mentioned in the video
My previous video about my procedural mountain forest.
My LayerProcGen framework and my talk about it at Everything Procedural Conference 2024.
My free game The Cluster (full trailer), which my LayerProcGen framework was originally developed for.
My blog post about the procedural creatures I alluded to.
The GPU Instancer Pro (Asset Store) third party tool I use for GPU instancing with frustum and occlusion culling.
The Grasslands - Stylized Nature (Asset Store) model pack I use for my new trees.
My blog post about my Point Cloud Sound technique.
My blog post about the game progression dependency graphs I alluded to.
My erosion filter video and blog post. The links section at the end of the blog post has links to implementations by others in various engines, tools, and games.
A GitHub Gist demonstrating shared C# and shader code.
My blog post about atmospheric perspective and distant mountains.
Frequently asked questions
The trees are popping. Could you fade them in instead?
Not very easily. The trees already use dither-based fading between the tree LOD levels. When you see trees pop into existance, it's because a terrain chunk is replaced with terrain chunks of a more detailed LOD level that has denser tree coverage. Fading the new trees in when this happens would require having an additional fading feature on top of the one used for tree LOD levels. Not only would it make the tree shaders more complex, it would also be a lot of work to route the required data into all the tree instances. It would require changes to GPU Instancer Pro third party tool I'm using, or else I'd have to use it in a significantly more low-level way. Either way, it's frankly beyond my skill level, as I'm not nearly as proficient with shader "data plumbing" as I am with shader math.
I made a hair shader
I've actually been working on a cool erosion technique I'll post about later, but during some downtime, I had an impulse to see if I could make a basic hair shader that doesn't require any specially made meshes or textures. I ended up making three hair shaders.
The shapes below are just standard Unity spheres and capsules and only a simple normal map is used; no other textures. The hair strands follow the vertical V direction of the UV map of the mesh.
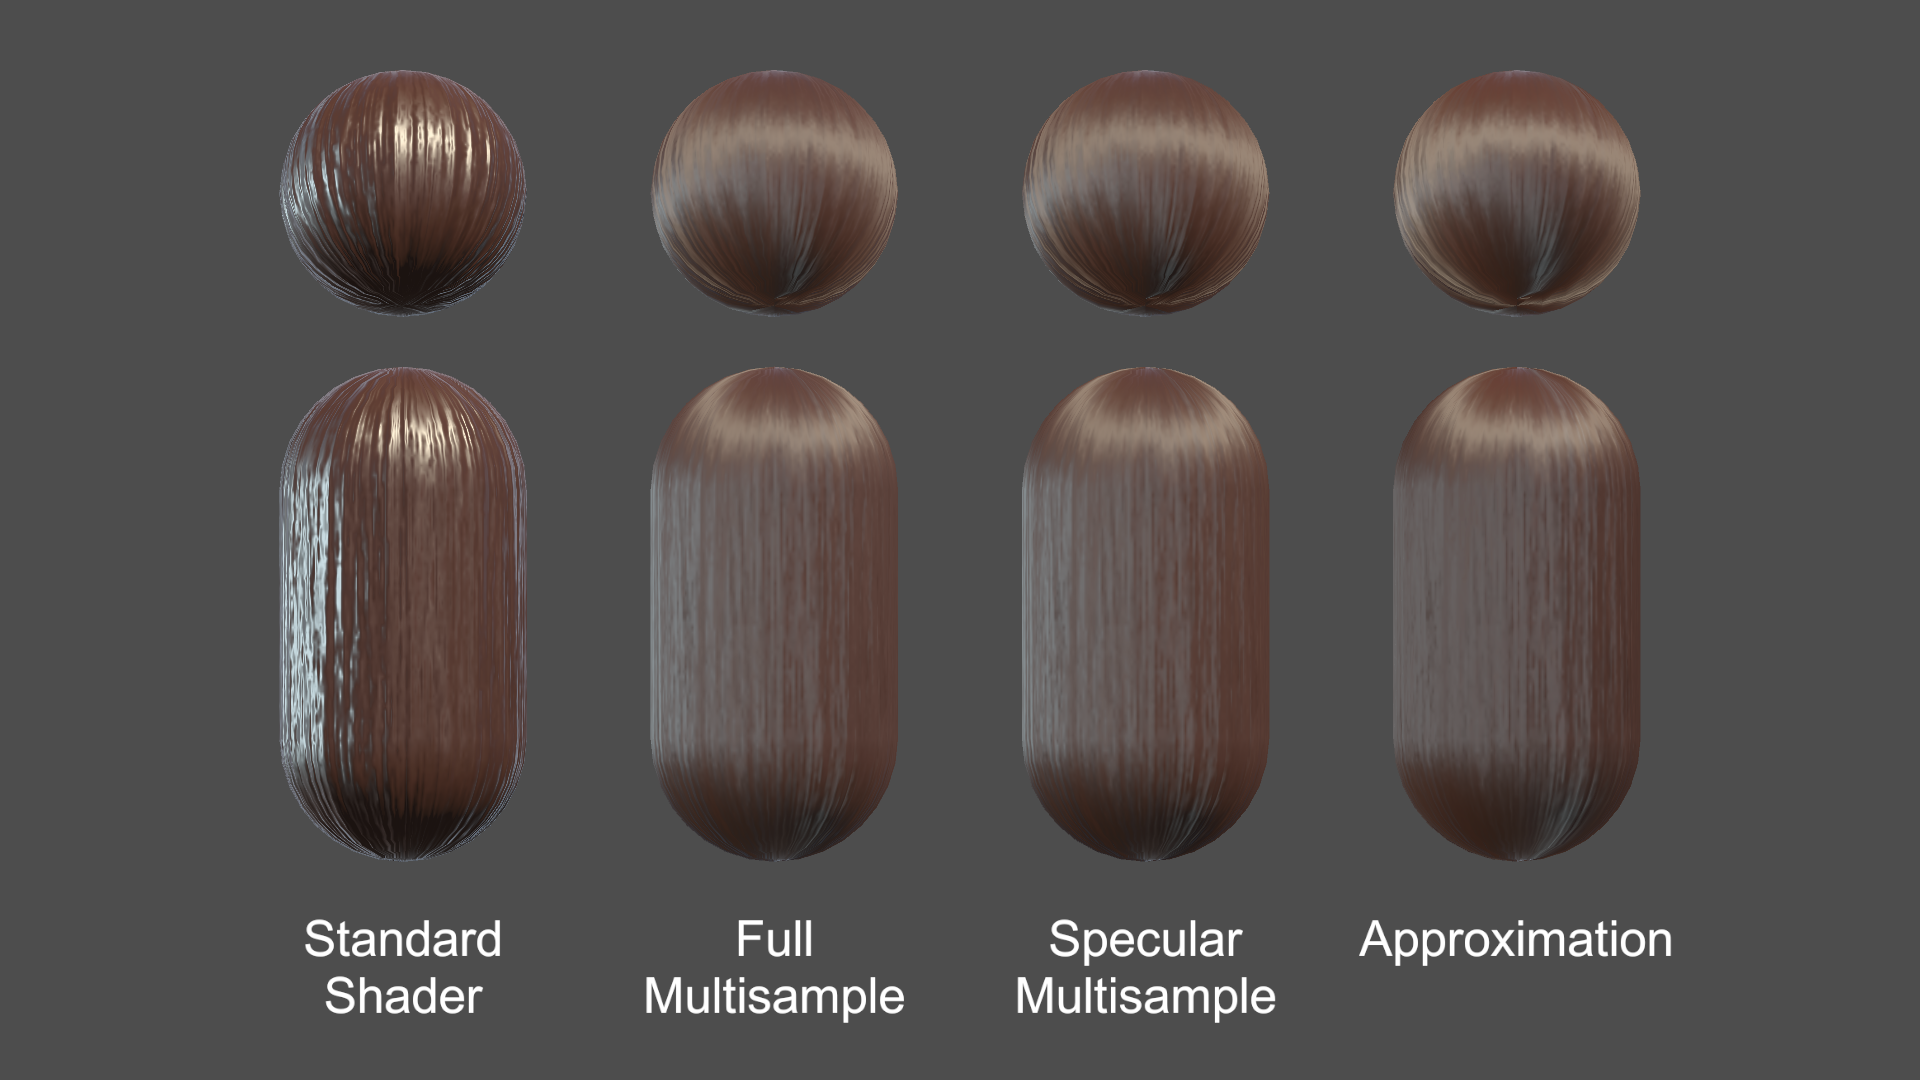
I also found some characters on the Asset Store and tried changing the hair material to use my shader. Luckily they all already had hair aligned vertically in the UV map (although not 100% for wavy/curly hair, which compromises my shader slightly).
You can see a video here with the shader in action on both basic shapes and characters:
I ended up making these three hair shader implementations:
- Full multisample hair shader
- Specular multisample hair shader
- Approximation hair shader
All three shaders support a diffuse map, a normal map, and properties for color, smoothness, and normal map strength. The diffuse map alpha is used for cutout transparency.
See the hair shader repository on GitHub
The strategy was to start with Unity's Standard shading model (based on BRDF physically based shading), but modify it to simulate anisotropic shading, that is, to simulate that the surface is made from lots of little parallel cylinders rather than a flat surface.
This approach ensures that the hair shader looks consistent with other materials based on Unity's Standard shader (and other Surface shaders) under a wide variety of lighting conditions and environments.
1) Full Multisample Hair Shader
I started out doing brute force anisotropic shading, running the Unity's physically based BRDF shading function up to 50 times and taking a weighted average of the sample colors.
The normals in those samples are spread out in a 180 degree fan of directions centered around the original normal, using the hair strand direction as the axis of rotation. The final color is a weighted average of the samples.
Much of the "magic" of the simulated anisotropic shading comes from the way the samples are weighted in the two multisample shaders (and emulated in the third).
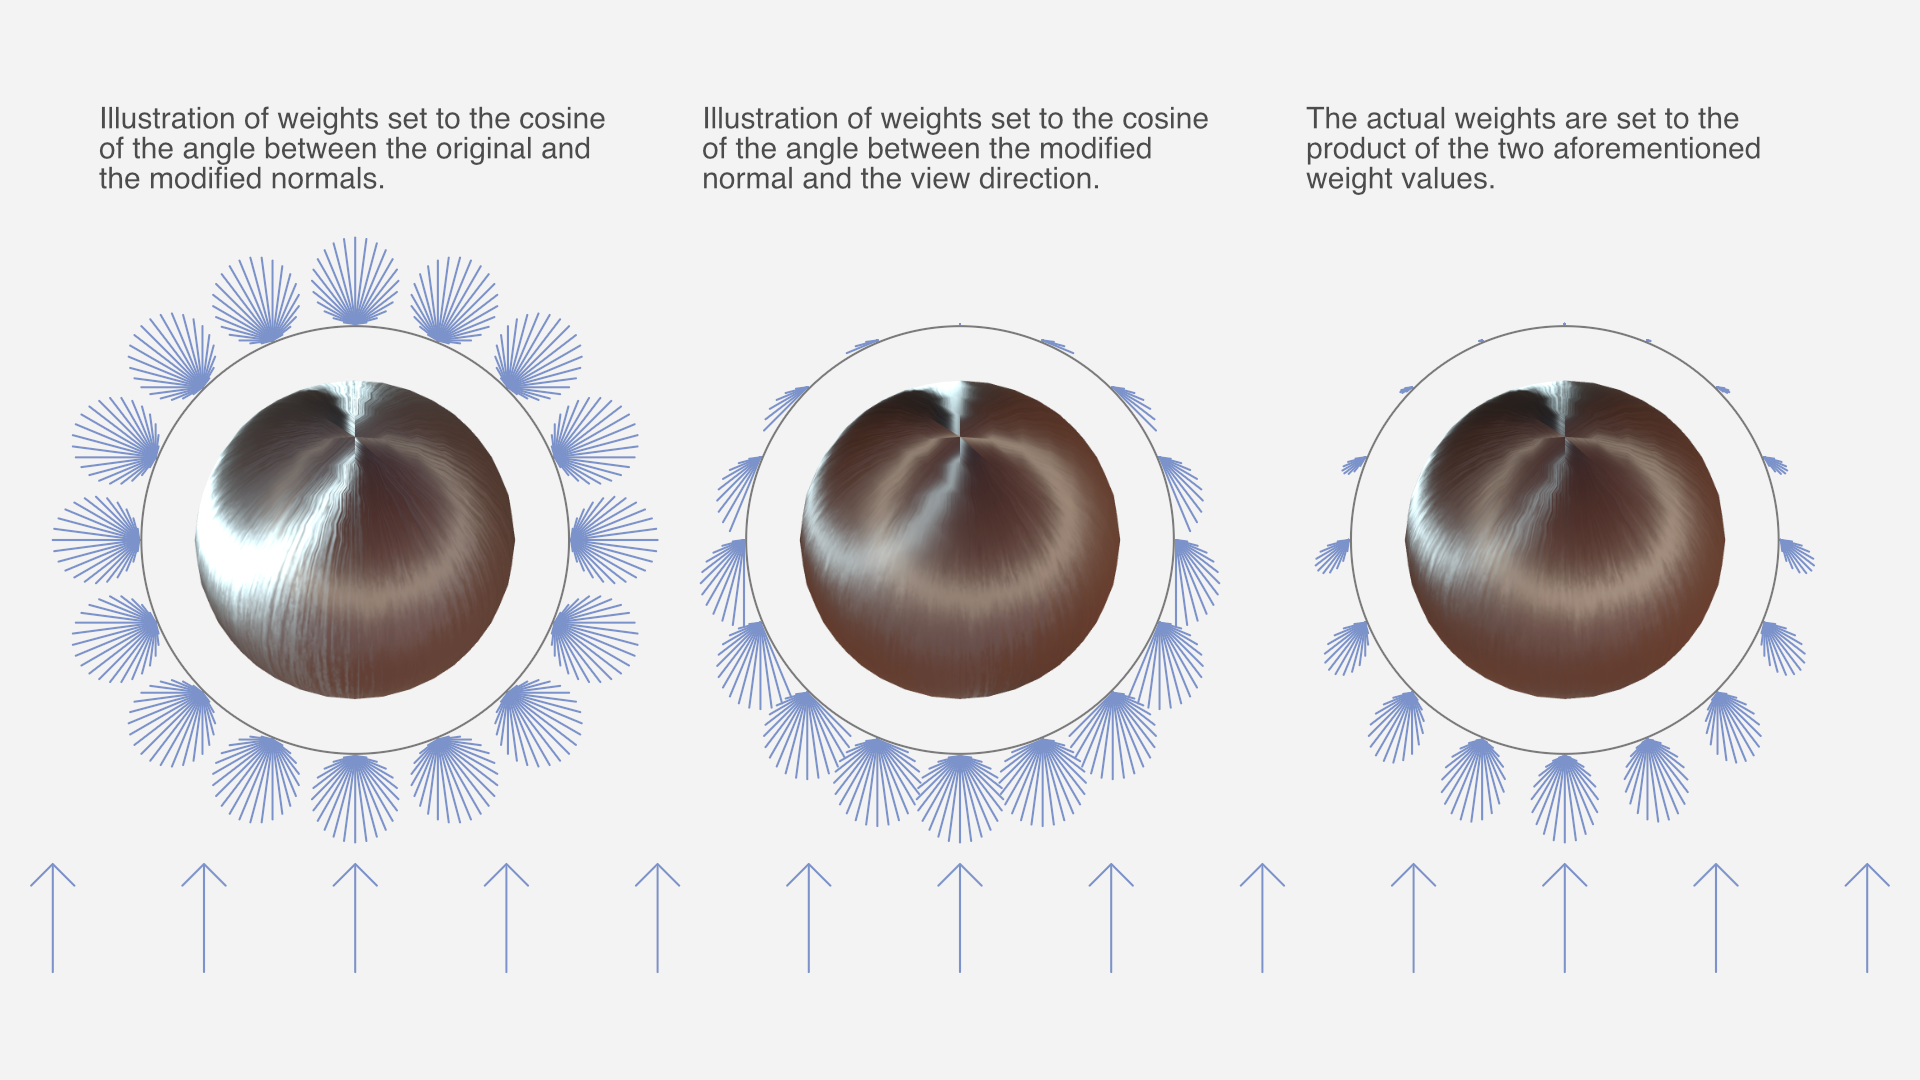
The weight of each sample is a product of two functions:
- The cosine of the angle between the original and modified normal. This is because strands of hair occlude other strands of hair when the hair "surface" is seen from the side, and the parts of strands that face outward tend to be less occluded.
- The cosine of the angle between the modified normal and the view direction. This is because the part of the strand that's facing the camera takes up more of the view than parts that are seen at an angle.
Both cosines are clamped to a zero-to-one range before the two are multiplied.
With this weight function to base the weighted average on, the results looked surprisingly good. Of course, running the entire shading up to 50 times is not exactly the fastest approach, performance-wise.
2) Specular Multisample Hair Shader
I made a second implementation that reduces computations somewhat by only multi-sampling certain calculations, namely dot products with the normal, and most of the specular term of the lighting. The diffuse term, fresnel, and other calculations are performed only once. The result is nearly indistinguishable from the full multisample hair shader.
There is still a significant amount of calculations being performed up to 50 times though.
3) Approximation Hair Shader
Of course, non-brute force approaches to hair shading are possible too, but way harder to make look good. Still, I eventually came up with something fairly decent.
The third implementation does not perform multisampling but instead emulates the same result. The math formulas required for this were devised by means of a combination of partial understanding, intuition, and trial and error, while carefully comparing the results with the full multisample hair shader. As such, it's difficult to explain the details of the logic behind it with any exactness, but you can see the details in the shader source code.
Closing thoughts
This was just a little experiment I did as a random side project. I haven't looked much at existing research on hair shaders, as I tend to not understand graphics papers very well. My impression is that this has less to do with the subject matter itself, and more to do with the manner in which it's explained.
The one research entry I did look at – Hair Rendering and Shading by Thorsten Scheuermann – only shows the results on a complex multi-layered haircut model; not simple spheres like I used for testing, which makes it impossible to compare results meaningfully.
I'm not planning any further work on the hair shaders, but I've released them as open source on GitHub. If anyone makes changes or improvements to them – or just use them in a project – I'd love to hear about it.
Charts to visualize how much you owe Unity for their per-install Runtime Fee
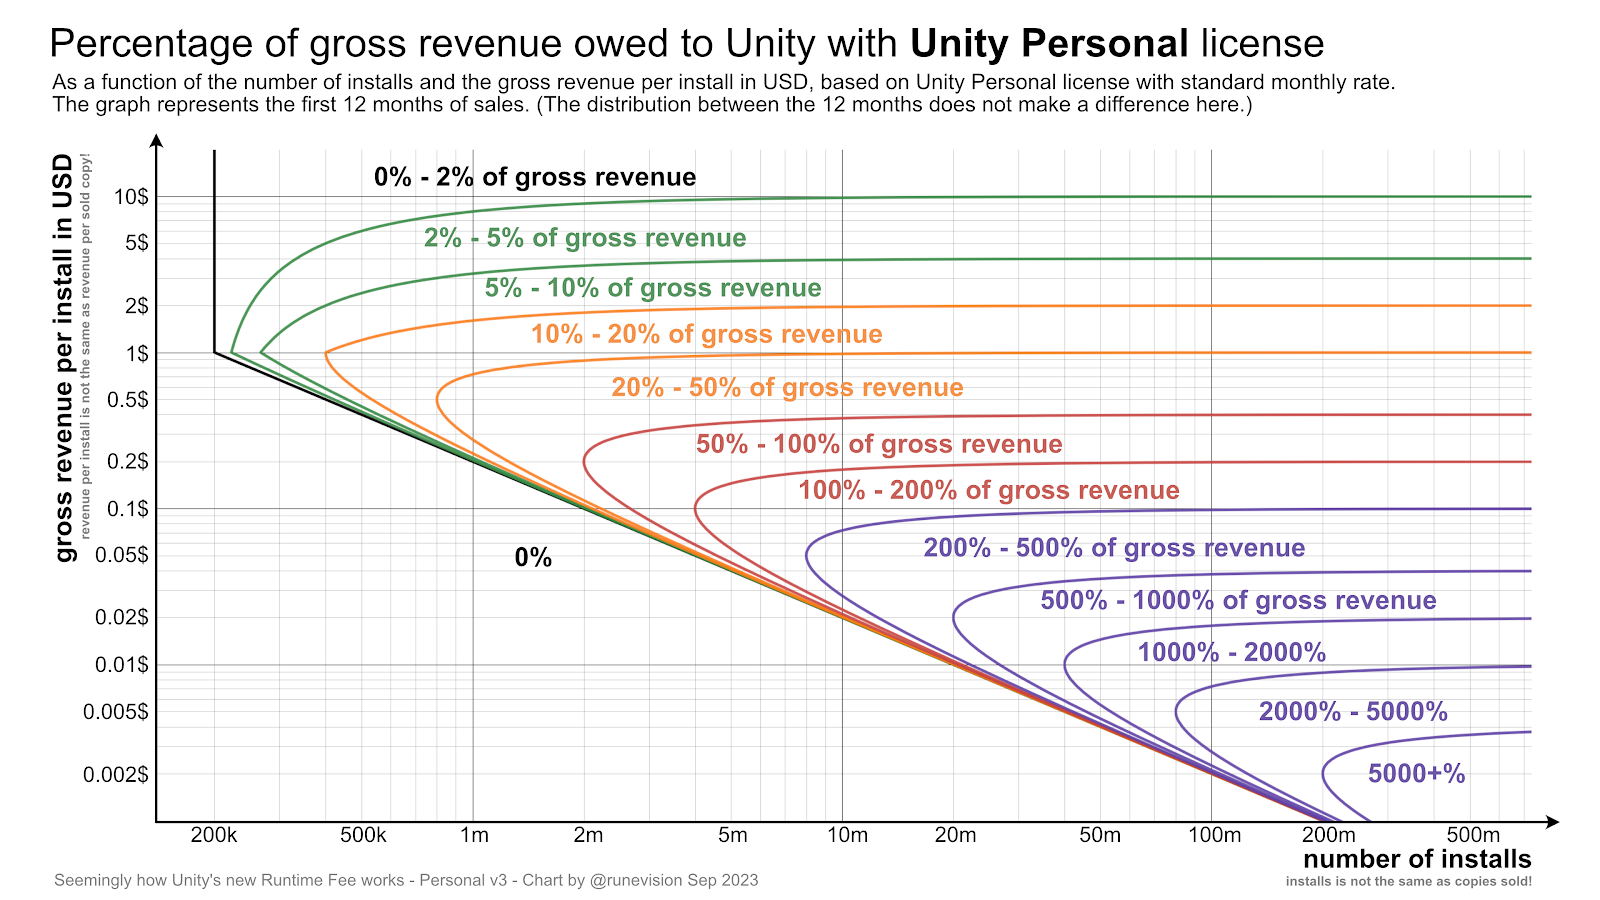
Unity Technologies has announced a new Unity Runtime Fee that charges developers a fee of up to $0.20 per installed game above certain thresholds. According to my calculations, it can be a bankruptcy death-trap, at least in certain cases.
Shockingly, the owed percentage is unbounded to the point that the owed amount can exceed gross revenue, since it depends on installs, not sales.
Update 1: Unity since backtracked and apologized for the announced changes. With the new updates to the terms, Unity will clamp the install fees to be at maximum 2.5% of revenue. And the changes will not be retroactive after all. Furthermore, John Riccotello is stepping down as CEO. There are more details in the linked blog post.
Update 2: About a year later, Unity canceled the runtime fee altogether. Good.
Nevertheless, Unity has suffered a tremendous decrease in trust and goodwill, which already was not great before. With the cancellation, there is less urgency for developers to switch to a different engine, but the whole situation has highlghted the importance of being prepared for such a scenario and have eyes and ears open towards other engines as well.
The original post continues below.
You can check out the specifications in their blog post. Based on those, I've made two charts where you can look up how big a percentage of your gross revenue you would owe Unity, based on the number of installs and on how much revenue you make for each of those installs. The fee specifications are different for Unity Personal and Unity Pro, so there is a chart for each.
Goodbye Unity
Today is my last day at Unity.
It's been nearly 12 years since I joined the then-tiny startup with ~20 employees. Now there's over 3000 and it's been quite the ride to be part of this company while it has evolved, especially with the big role it has had in evolving the whole game industry too.
Lately I've been longing to do something smaller again, and so it's time for a new adventure in my work life to begin. Starting next week, I'm a full time indie developer!

For a start I'll be wrapping up my VR action-adventure game Eye of the Temple that I've been working on part time for the past 4 years. There's a demo on Steam already that has very positive reviews and I expect the full game can ship in early spring 2021.
What I'll do after is not fully settled yet, but I have an idea for a (non-VR) game set in a big forest full of ruins, strange artifacts, pathways and mysteries that I might begin working on next year.
My mental state at the moment is kind of a mixed bag. On the one hand I'm very excited about future possibilities and being able to work on exactly what I want. On the other, my motivation and productivity is a bit flaky these days. I don't know the exact reasons, but possibilities could include:
- Uncertainty about what my everyday life will be like (though economically I'll be fine!).
- Having felt unfulfilled work-wise for a good while before I quit.
- Having moved to a new country this summer (from Denmark to Finland), in the middle of a pandemic where it's hard to meet new people.
- Being in the end stretch of developing a game where it's mostly boring stuff left.
- Dark winter setting in - that normally doesn't affect me much but could be a compounding factor still.
However, I'll go easy on myself and just accept my productivity and motivation not being at its greatest right now. Perhaps I won't hit the ground running in my new indie life, but that's okay. I didn't have that much vacation this year either, so I'll see this as a chance to take it a bit easy for a little while while I adjust to my new life.
All in all, not a bad place to be, and I'm excited about the future!
Creaking Gorge and The Cauldron
Since my last post in July where I finally got a vision down for the level design in Eye of the Temple, I've been feeling super productive adding new areas and features to the game.
In August I added two new areas and in September I've been revamping the in-game UI and the speedrun mode. Only problem is I haven't kept up with these blog posts. To avoid this post getting too long, I'll cover the new areas here and save the UI work for a later post.
Creaking Gorge
Creaking Gorge is an area where you move along and into cliff sides and atop wooden scaffolding. It's by far the most vertical area in the game, spanning more than 50 meters vertically.

Level design workflows
Let me talk a bit about my workflows for doing level design in Eye of the Temple since I recently had some progress in that area.
I've been in something akin to a level design writer's block for a long time, being able to rework individual small areas, but unable to start the major world redesign that I've been intending for over a year.
Maybe calling it writer's block is pretentious - the fact is that I've never done this sort of work before, so I may just not have developed the necessary workflows to deal with it. Anyway, I think I might have finally cracked the nut.
I've had plenty of ideas, but fragmented and not crystallized enough to get down on paper. How do you start planning a non-linear world meant to be highly interconnected and interdependent? I can talk about what eventually worked for me.
I've long pondered what type of document could help me get ideas down on paper in a quick way. In addition to text documents (glorified to-do lists) I've been using tilemaps for sketching level designs.
I've been experimenting with using Unity Tilemaps as a digital replacement for pencil level design sketches. Some success so far, although I'm really missing rotation/flipping of selection and proper multi-selection.
— Rune Skovbo Johansen (@runevision) November 27, 2017

January 2018 update
It seems like I didn't blog since July. How scandalous! Well, here's an update on what I worked on for Eye of the Temple since then.
Presented as a series of tweets, because that's what I have time for.
Note: Add blockers seem to sometimes randomly block some of the embedded tweets for some reason.
Prettier background environment
The cold snowy mountains didn't give the feeling I was aiming for. Failing to find anything ready-made that fit the bill, I created my own lush, mountainous environment.
What do you think of this new environment art for the backdrop of the temple that we've been working on? #gamedev #indiedev #VR #HTCvive pic.twitter.com/ASGxGCeG3p
— Eye of the Temple (@eyeofthetemple) September 20, 2017
Another shot of the mountains surrounding the temple. #screenshotsaturday #gamedev #indiedev #VR #HTCvive #madewithunity pic.twitter.com/GmfAwyzPvp
— Rune Skovbo Johansen (@runevision) September 23, 2017
Failed attempts at mixed reality capture with StereoLabs ZED stereo camera
I think a mixed reality video would be the ideal way to show off Eye of the Temple, so I invested a bit in this. Unfortunately it didn't go well due to a combination of a bad choice of immature tech, and an insufficient green-screen setup. I might revisit this in the future though.
@stereolabs3D Could you show how this 3D printed mount is meant to be used with a Vive controller and tracker respectively? pic.twitter.com/UqoEm0E77v
— Rune Skovbo Johansen (@runevision) September 16, 2017
It's designed to hold a Vive controller, a tracker and even an oculus touch. pic.twitter.com/yc4fC2J5ZJ
— Stereolabs (@Stereolabs3D) September 16, 2017
I posted a video here with my troubles. See tracking issue at 8:04. I mailed your support with more details. https://t.co/DCk6KeRO0O
— Rune Skovbo Johansen (@runevision) September 23, 2017
Argh! Mixed reality recording is hard! #VR #mixedreality #HTCVive #indiedev pic.twitter.com/YWVH6oFgc9
— Rune Skovbo Johansen (@runevision) September 26, 2017
Glowy light for certain platforms
Any Unity shader experts who might know why I get heavy banding on alpha of frag function output on Windows (but not Mac)? pic.twitter.com/Xrq8CliYNo
— Rune Skovbo Johansen (@runevision) October 16, 2017
I made a spiky glow for this platform. Helps a bit with awareness of edges without having to look down all the time. #VR #gamedev #indiedev pic.twitter.com/I9ScvbmzZL
— Rune Skovbo Johansen (@runevision) October 17, 2017
New build for testers with whip and other improvements
I finally finished developing the whip and got a build out to the testers.
Trying to recruit people to test the speedrun mode (never had any luck!)
The speedrun mode is super fun and challenging to me, but nobody else seem interested in it. Besides asking on twitter I also contacted some of the notable VR speedrunners and people who has posted about VR speedrunning on Reddit, but got nothing out of it. If anyone reading this have a Vive and would like to try it, do let me know!
#speedrunning in #VR with #HTCVive? Anyone want to give the speedrun mode of @eyeofthetemple a go? https://t.co/6g2WSQ2jnT pic.twitter.com/MtVtMKdLC0
— Rune Skovbo Johansen (@runevision) October 26, 2017
Implemented a new type of dangerous rooms for the temple
The reviews for this feature are through the roof.
Watch out! Working on a new type of danger in @eyeofthetemple... #screenshotsaturday #gamedev #indiedev #VR #HTCVive pic.twitter.com/95uYeL3b86
— Rune Skovbo Johansen (@runevision) October 28, 2017
It's getting tight in here. @eyeofthetemple #screenshotsaturday #gamedev #indiedev #VR #HTCVive pic.twitter.com/Tvrd3OcWk2
— Rune Skovbo Johansen (@runevision) October 28, 2017
"What do you mean I have to get in there!?" New room in @eyeofthetemple #screenshotsaturday #gamedev #indiedev #VR #HTCVive pic.twitter.com/7lE2iqorVD
— Rune Skovbo Johansen (@runevision) October 28, 2017
Got serious working on the big level design overhaul
Still far from finished with this one.
I've been experimenting with using Unity Tilemaps as a digital replacement for pencil level design sketches. Some success so far, although I'm really missing rotation/flipping of selection and proper multi-selection. pic.twitter.com/jT2PZloAYE
— Rune Skovbo Johansen (@runevision) November 27, 2017
I'm using #unity3d tilemaps for level design planning of multi-story structures. Moving things around becomes a pain though; having to do it separately for each layer. Any better alternatives? pic.twitter.com/STSb8AarvB
— Rune Skovbo Johansen (@runevision) December 29, 2017
Worked on a texture tool "Bricker" to easily create bricks and carved shapes
I've been continuing refining my tool for generating textures+normals from simple color masks. Output quality is getting there... #gamedev pic.twitter.com/jWzCUdc6Oz
— Rune Skovbo Johansen (@runevision) December 11, 2017
More on that in another post.
Contracted a few pieces of concept art to get inspiration for improving the visual look of the game
I've had decent progress towards realizing the concept art vision for @eyeofthetemple. I'll put further work on that on hold for now and focus again on a level design overhaul. #gamedev #indiedev #screenshotsaturday #VR #HTCvive pic.twitter.com/csUc4C5o7p
— Rune Skovbo Johansen (@runevision) December 23, 2017
And finally, introduced this little birdy
Bird spotted by the temple. #gamedev #indiedev #VR #HTCVive #birds pic.twitter.com/x8W7IRm54g
— Rune Skovbo Johansen (@runevision) January 15, 2018
That's it for now. Hope you enjoyed this glimpse into the development, and see you soon. Back to working on the game for me!
Remember you can also follow the development as it happens following @EyeOfTheTemple or @runevision on twitter.
July update: Trials and triumphs of whips and levers
Here's the latest updates on the development of my Vive VR game Eye of the Temple.
For the past several months I've been working on improving the whip I prototyped last year. In the last post, I showed how it could grab levers, but there were a lot of issues and the whip and lever didn't exactly look pretty. Now see what it looks like now:
This feels really good to use now. It didn't get to this point without a lot of issues on the way though.

June update: Verticality, puzzles, whip
Here's the latest updates on the development of my Vive VR game Eye of the Temple.
For the past month I've been mainly working on improving the whip I prototyped last year. It can now be used to grab levers at a distance, and then you can yank the whip backwards to activate the lever.
Testing whip and lever in Eye of the Temple. Still some way to go, but getting there. #gamedev #indiedev #vr #HTCvive pic.twitter.com/8TZHflQnM2
— Rune Skovbo Johansen (@runevision) May 20, 2017
There's still some way to go, especially with getting the audio cues right. The physics will never be quite like a real whip, but making it satisfying to use is the top priority.
Apart from this I've been looking into designing more puzzles for the game. I'm no expert puzzle designer, but bit by bit I come up with some that I think work well. The latest involve tall rotating towers, activated by levers (no whip use necessary for this one) where you need to step around on and in them at two different levels.
This also marks my increased effort in making better use of verticality in the level design. Experiencing the great heights is a draw of the game, and I'm figuring out how to use that optimally.
"Add more verticality" they said, and I agree! New puzzle elements in @eyeofthetemple #VR #HTCVive #madewithunity https://t.co/hvxgYxW0uR pic.twitter.com/tjDuCk2ufo
— Rune Skovbo Johansen (@runevision) June 13, 2017
I don't have a new build with these new things yet. The work right now is on smaller isolated pieces and puzzles, and once I have a set of those that fit nicely together, I'll begin integrating it all back into the overall world design.
April update: Fire, blades, speedrun mode
Here's the latest updates on the development of my Vive VR game Eye of the Temple.

New additions:
- Fire! One challenge tunnel now has fire hazards.
- Blades! One challenge tunnel now has swinging blades.
- Speedrun mode! A more challenging way to play the game. More notes below.
- Hat! You're now wearing a hat. Hope you like hat.
- Experimental spectator camera. 3rd person view. More notes below.
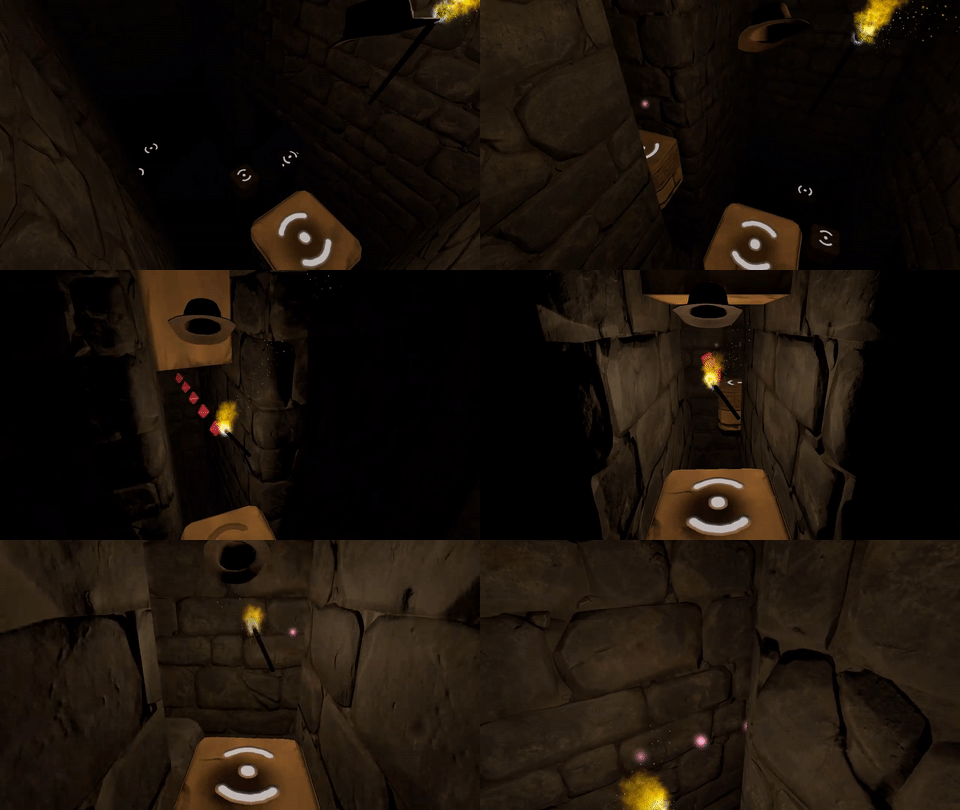
- Field of view is now restricted when close to falling and when falling in order to further reduce risk of motion sickness.
- Placeholder ambient soundscape taken out of the game for now since it had confusing footstep sounds.
Speedrun mode
For those of you who wanted more challenge in the game, there is a new speedrun mode. This mode times your play-through but also speeds up the platform movements as long as you can keep up.
This mode is has a higher risk of being uncomfortable, causing motion sickness, and falling over, so engage on your own risk.
- Each time you take a perfectly timed step onto a new platform, the game will speed things up a little bit.
- Each time you miss an opportunity to step onto a new platform, the game will slow things down a little bit. (This can occasionally happen through no fault of your own.)
- When you die, the speed is reset, so it's recommended to keep to a speed you can handle in order to not lose momentum in your speedrun. You can avoid speeding thing further up by taking steps in a slightly slower way.
I do not recommend this mode to people who haven't already played through the game at least once, so in the final game I'll probably only unlock the speedrun mode by completing the game.
How to use: For now though, you start a speed run by first starting a new game, and then press Shift+R on the keyboard.
Experimental spectator camera
The gameplay in Eye of the Temple can be hard to get an impression of for others by looking out in first person. I've experimented with an alternative camera angle shown on the monitor that shows the action from 3rd person perspective.
How to use: Activate/toggle 3rd person spectator camera by pressing X on the keyboard.
This view requires extra resources from your computer, so if you get performance problems, turn it off.
What do you think of 3rd person spectator camera? Is it something you might use for streaming, videos, or for people watching you play? It's still a bit buggy and has room for improvement, but I'm curious what you think of the overall idea.
February update: Gems
Here's the latest updates on the development of my Vive VR game Eye of the Temple.

New features:
- There are now gems throughout the temple that you can collect.
- Moving platforms have glowing symbols on them.
- Visuals: Intro area has some red stones and some of the dungeons have grittier gray stones and spikes.
- The way the platforms move has been tweaked, hopefully to further reduce potential for dizziness.
Notes on gems
The gems are found throughout the temple. The exact placement tries to take player proportions into account so that they are at a comfortable distance for reaching. I haven't tested this on different people yet though. If you could let me know how it works for you and how tall you are, that would be helpful. If you don't want to share that, that's ok too.
Right now the gems don't do anything yet. Later I will implement at the minimum a way for you to see how many you collected.
Beyond that I need to decide if the gems have a critical or non-critical function:
A critical function of the gems could be if they are used to unlock new areas in the game and thus are needed to progress. Or an almost-critical function would be to unlock alternative paths or secret rooms not otherwise accessible. This is still fairly critical because it would be annoying if you're trying to see 100% content of a game to find out you can't due to some mistake made earlier that's too late to do anything about. Currently there are one-way platforms that you can take which will prevent you from going back to collect any gems you might have missed. If I make the gems critical, I'd have to find a way to make it possible to always go back to all areas of the temple.
Non-critical functions of the gems could be high-score, achievements, and, I dunno, unlockable hats if I get a selfie stick implemented for the game. :P Old games would typically grant you extra lives, but it doesn't work for modern games with infinite lives.
For now I refrained from placing gems at platforms that only go one way. If there were gems there and you failed to pick one up, you wouldn't have a second chance and I thought that might feel unfair or frustrating.
Early testers online forum
In order to try to get faster feedback and shorter iteration cycles, I opened up for people to sign up online to be early testers of the game. If you have access to a Vive (and 2.2 by 2.2 meters space) and would like to try out the game and provide detailed feedback based on your experience, please don't hesitate to join!
Sign up to provide feedback on early builds of Eye of the Temple
January update: Visuals, usability and early testing
For a while, my focus for my Vive VR game Eye of the Temple have been to not expand more on gameplay right now but rather on improving what I've got in order to make it as presentable as possible.
That has meant:
- Improving visuals.
- Addressing usability issues found in play-testing.
(If anybody wonder what happened to the Whip Arena spin-off game, I put that on hold after it become clear it only worked well with a quite large physical VR space, which very few people have available.)
3D models
Gate model. Two keys must be inserted above the gate to unlock and open it:

Stone torch model. You light these with your torch to trigger things happening:

Cliffs model. The temple used to just float in the air; now it's grounded:

For a long time the game was full of placeholder models made of simple boxes and cylinders. There's still some of those left, but I've been working on replacing them all with proper models.
After briefly planning to work with contractors for 3D models, I decided to learn 3D modeling myself instead (and deal with the various challenges that come with it).
The models I need have highly specific requirements (they need to have very exact measurements and functionality to fit into the systems of the game) yet in the end they are quite simple models (man-made objects with no rigging).
With this combination it turned out that back-and-forth communication even with a very skilled artist took as much time as just doing the work myself. I'll still be working with artists for the game, just not for the simple 3d models I need.
Several of the models still have placeholder texturing. I have an idea for a good texture creation workflow for them, but it will take a little while to establish, so I'm postponing that while there's more pressing issues.
Intro section
My goal is that Eye of the Temple should be a rather accessible game. You need a body able to walk and crouch, and not be too afraid of heights, but I want it simple enough to play that people who don't normally play computer games can get into it without problems.
This has largely been a success. Gamers or not, I normally just let people play without instructions, and they figure things out. My dad completed the whole thing in one hour-long session when he was visiting.
The game did throw people in at the deep end though, asking them right from the start to step between moving platforms four meters above the ground. Some people would hesitate enough to end up mis-timing their step and stumble, making the experience even more extreme right from the beginning.
To ease people a bit more in, I've worked on an intro section that starts out with only a 0.75 meter drop, and the first two platforms have no timing requirement. I have yet to get wide testing of this to see if it helps.

There is one particular problem I've toiled with for a while, which is to design a platform that bridges two spots in a compact manner. Why this is tricky relates to how the game lets you explore a large virtual space using just a small physical space.
Originally I had platforms rotating around a center axis, but that made some people motion sick who otherwise didn't have problems with the rest of the game.

I tried various contraptions to replace it, but they were complicated and awkward to use. My latest idea is using just a barrel-like rolling block, which is nice in its simplicity, and also a fun little gimmick to balance on once you understand how to use it.
Figuring out what you're meant to do is easy to miss though, as I found out with the first tester trying it. I have some ideas for a subtle way to teach it, but that will take quite some time to implement. For now I settled for slapping a sign up that explains it.

Early testers online forum
There is no substitute for directly observing people playing a game, but this is impractical for me to do frequently when I also have a full-time job. I'm lucky if I get to do it two times a month.
In order to try to get faster feedback and shorter iteration cycles, I've now opened up for people to sign up online to be early testers of the game. If you have access to a Vive and would like to try out the game and provide detailed feedback based on your experience, please don't hesitate to join!
Sign up to provide feedback on early builds of Eye of the Temple
The quest for automatic smooth edges for 3d models
I'm currently learning simple 3D modeling so I can make some models for my game. I'm using Blender for modeling.
The models I need to make are fairly simple shapes depicting man-made objects made of stone and metal (though until I get it textured it will look more like plastic). There are a lot of flat surfaces.
The end result I want is these simple shapes with flat surfaces - and smooth edges. In the real world, almost no objects have completely sharp edges, and so 3d models without smooth edges tend to look like they're made of paper, like this:

What I want instead is the same shapes but with smooth edges like this:

Here, some edges are very rounded, while others have just a little bit of smoothness in order to not look like paper. No edges here are actually completely sharp.

The two images above shows the end result I wanted. It turns out it was much harder to get there than I had expected! Here's the journey of how I got there.
How are smooth edges normally obtained? By a variety of methods. The Blender documentation page on the subject is a bit confusing, talking about many different things without clear separation and with inconsistent use of images.
Edge loops plus subdivision surface modifier
From my research I have gathered that a typical approach is to add edge loops near edges that should be smooth, and then use a Subdivision Surface modifier on the object. This is also mentioned on the documentation page above. This has several problems.
First of all, subdivision creates a lot of polygons which is not great for game use.
Second, adding edge loops is a manual process, and I'm looking for a fully automatic solution. It's important for me to have quick iteration times. To be able to fundamentally change the shape and then shortly after see the updated end result inside the game. For this reason I strongly prefer a non-destructive editing workflow. This means the that the parts that make up the model are kept as separate pieces and not "baked" into one model such that they can no longer be separated or manipulated individually.
Adding edge loops means adding a lot of complexity to the model just for the sake of getting smooth edges, which then makes the shape more cumbersome to make major changes to afterwards. Additionally, edge loops can't be added around edges resulting from procedures such as boolean subtraction (carving one object out of another) and similar, at least not without baking/applying the procedure, which is a destructive editing operation.
Edge loops and subdivision is not the way to go then.
Bevel modifier
Some posts on the web suggests using a Bevel modifier on the object. This modifier can automatically add bevels of a specified thickness for all edges (or selectively if desired). The Bevel modifier in Blender does what I want in the sense that it's fully automatic and creates sensible geometry without superfluous polygons.

However, by itself the bevel either requires a lot of segments, which is not efficient for use in games (I'd want one to two segments only to keep the poly count low) or when fewer segments are used it creates a segmented look rather than smooth edges, as it can also be seen below.

Baking high-poly details into normal maps of low-poly object
Another common approach, especially for games, is to create both a high-poly and a low-poly version of the object. The high-poly one can have all the detail you want, so for example a bevel effect with tons of segments. The low-poly one is kept simple but has the appearance from the high-poly one baked into its normal maps.
This is of course a proven approach for game use, but it seems overly complicated to me for the simple things I want to achieve. Though I haven't tried it out in practice, I suspect it doesn't play well with a non-destructive workflow, and that it adds a lot of overhead and thus reduces iteration time.
Bevel and smooth shading
Going back to the bevel approach, what I really want is the geometry created by the Bevel modifier but with smooth shading. The problem is that smooth shading also makes the original flat surfaces appear curved.
Here is my model with bevel and smooth shading. The edges are smooth sure enough, but all the surfaces that were supposed to be flat are curvy too.

Smooth shading works by pretending the surface at each point is facing in a different direction than it actually does. For a given polygon, the faked direction is defined at each of its corners in the form of a normal. A normal is a vector that points out perpendicular to the surface. Only, we can modify normals to point in other directions for our faking purposes.
The way that smooth shading typically calculates normals makes all the surfaces appear curved. (There is typically a way to selectively make some surfaces flat, but then they will have sharp edges too.) The diagram below shows the normals for flat shading, for typical smooth shading, and for a third way that is what I would need for my smooth edges.

So how can the third way be achieved? I found a post that asks the same question essentially. The answers there don't really help. One incorrectly concludes that Blender's Auto Smooth feature gives the desired result - it actually doesn't but the lighting in the posted image is too poor to make it obvious. The other is the usual edge loop suggestion.
When I posted question myself requesting clarification on the issue, I was pointed to a Blender add-on called Blend4Web. It has a Normal Editing feature with a Face button that seems to be able to align the normals in the desired way - however as a manual workflow, not an automated process. I also found other forum threads discussing the technique.
Using a better smoothing technique
At this point I got the impression there was no way to get the smooth edges I wanted in an automated way inside of Blender, at least without changing the source code or writing my own add-on. Instead I considered an alternative strategy: Since I ultimately use the models in Unity, maybe I could fix the issue there instead.
In Unity I have no way of knowing which polygons are part of bevels and which ones are part of the original surfaces. But it's possible to take advantage of the fact that bevel polygons are usually much smaller.
There is a common technique called face weighted normals / area weighted normals (explained here) for calculating averaged smooth normals which is to weigh the contributing normals according to the surface areas of the faces (polygons) they belong to. This means that the curvature will be distributed mostly on small polygons, while larger polygons will be more flat (but still slightly curved).
From the discussions I've seen, there is general consensus that this usually produces better results than a simple average (here's one random thread about it). It sounds like Maya uses this technique by default since at least 2014, but smooth shading in Blender doesn't use it or support it (even though people have discussed it and made custom add-ons for it back in 2008), nor does the model importer in Unity (when it's set to recalculate normals).
Custom smoothing in Unity AssetPostprocessor
In Unity it's possible to write AssetPostprocessors that can modify imported objects as part of the import process. This can also be used for modifying an imported mesh. I figured I could use this to calculate the smooth normals in an alternative way that produces the results I want.
I started by implementing just area weighted normals. This technique still make the large faces slightly curved. Here is the result.

Honestly, the slight curvature on the large faces can be hard to spot here. Still, I figured I could improve upon it.
I also implemented a feature to let weights smaller than a certain threshold be ignored. For each averaged normal, all the contributing normals are collected in a set, and the largest weight is noted. Any weight smaller than a certain percentage of the largest weight can then be ignored and not included in the average. For my geometry, this worked very well and removed the remaining curvature from the large faces. Here is the final result again.

The code is available here as a GitHub Gist. Part of the code is derived from code by Charis Marangos, aka Zoodinger.
Future perspectives
The technique of aligning smooth normals on beveled models with the original (pre-bevel) faces seems to be well understood when you dig a bit, but poorly supported in software. I hope Blender and other 3D software one day will have a "smooth" option for their Bevel modifier which retains the outer-most normal undisturbed.
A simpler prospect is adding support for area weighted normals. This produces almost as good result for smooth edges, and is a much more widely applicable technique, not specific to bevels or smooth edges at all. That Blender, Unity and other 3D software that support calculating smooth normals do not include this as an option is even more mind-boggling, particularly given how trivial is it to implement. Luckily there workarounds for it in the form of AssetPostprocessors for Unity and custom add-ons for Blender.
If you do 3D modeling, how do you normally handle smooth edges? Are you happy with the workflows? Do some 3D software have great (automatic!) support for it out of the box?
Spin-off game: Whip Arena
I've spend the past few days at Exile (like a game jam but not a jam this year). I've envisioned having a whip in Eye of the Temple for a long time, and at Exile I began developing this whip mechanic.
In the main game, the whip is meant to be just one element in the gameplay, aiding in puzzles, like being able to grab and switch levers from a distance, and grabbing objects to pull towards you. However, for now I started out making a little self-contained game based just around the whip, so that I could focus on getting the feel right first.
At the end of Exile I had "whipped up" a little game I might call "Eye of the Temple - Whip Arena". Here's a video of the gameplay:
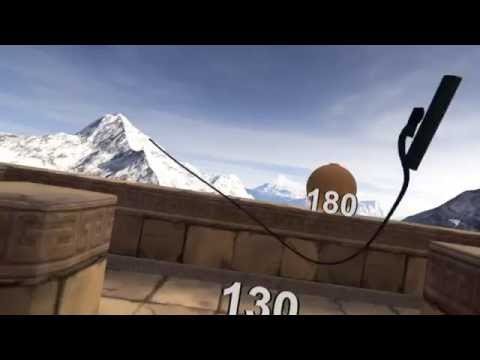
Implementing the whip physics was rather tricky. I've ended up with something that doesn't work quite like a real-world whip - you can't really make it do a crack in mid-air - but feels very responsive in its own way. The sound and haptics is based directly on the simulation, and I found it quite satisfying to use.
Now I'm wondering if I should take a little break from developing the full Eye of the Temple game and try to get this little arena game (which is much smaller in scope) finished and released first. I wonder if it's something people might be interested in? It definitely got positive reactions and feedback at Exile.
I'm thinking it would work well as an infinite game with high scores. There's not yet any fail condition though - I'm trying to think what might work well for that. I also need to implement some kind of bonuses and multipliers in the scoring probably.
As a side note - after spending several days prototyping and implementing this whip mechanic at Exile, I ended up with quite sore shoulders from whipping so much. ;)
If you have a Vive and would like to be an early tester of Whip Arena, let me know.
Announcing Eye of the Temple
I've been working on a VR game for the past months. It's called Eye of the Temple and it's a Vive game quite unlike any other.
Here's a pre-alpha trailer for it!
That's the first time I've made a trailer by the way. Quite challenging but also fun! It's got some placeholder models in it and it's made from playtest footage rather than clips made specifically for this trailer, but I tried to make the best of what I got.
Eye of the Temple is currently at an early stage in development.
Speaking of placeholder models, I'm just beginning now to look into working with contractors to have some nice art created for the game. If you know of any skilled concept artists or 3d modelers who'd like to design ancient contraptions for a game like this, let me know!
I previously worked on the game jam game Chrysalis Pyramid. Eye of the Temple is based on a similar core mechanic, but expands upon it in scope and variety, and is completely rewritten and redesigned from scratch. The goal is a commercial release in 2017.
Playtesting so far has been very promising and it's a lot of fun developing the game. Follow the development here and on Twitter, and let me know what you think!
The Big Forest
I've been continuing my work on the procedural terrain project I wrote about here. I added grass, trees and footstep sounds (crucial!) and it's beginning to really come together as a nice forest to spend some time in.
I made a video of it here. Enjoy!
If you want to learn more about it, have a look at this thread on the procedural generation subreddit.

Working with puzzle design through state space visualization
In the beginning of 2014 I was interested in procedurally generating computer games puzzles with typical elements like toggles, gates that can be triggered to open, boxes or boulders that can be moved onto pressure plates, etc. Many games contain elements like these and I took inspiration in particular from the game Lara Croft and the Guardian of Light.
To better understand these puzzles, and understand what makes a puzzle interesting or boring, I started creating a tool for analyzing and visualizing the state space of the puzzle. In the Procedural Content Generation mailing list I discussed the approach here.I've worked on it on and off since, and while I still don't have an algorithm for procedurally generating the puzzles, the tool itself is interesting in its own right. It's called PuzzleGraph and I've just released it for free.

You can setup and connect puzzle elements like gates, toggles, pressure plates and boulders, and see the state space of the puzzle visualized, including solution paths, dead ends and fail states.
If you make some puzzles with PuzzleGraph, I'd love to see them!
The best demonstration is this video I made. If you already saw the video, skip down a bit for some new info and announcements.
Creating natural paths on terrains using pathfinding
Pathfinding is not just for finding paths for AI agents/NPCs and similar. It’s also for procedurally creating paths.
While working on path creation for a procedural terrain, I had the problem that the generated paths would keep having too steep sections, like this:

It was too steep and also didn’t look natural at all. I kept increasing the cost multiplier for slopes, but it didn’t help.
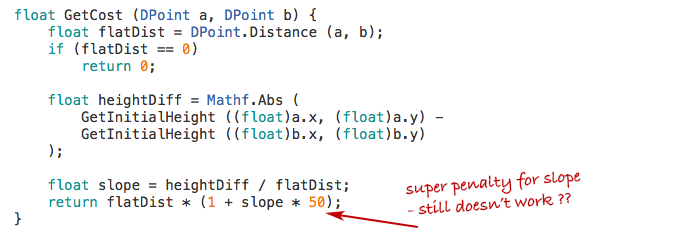
Then it hit me: My function just penalized the vertical distance, but it didn’t make any difference if this vertical distance came gradually or all at once.
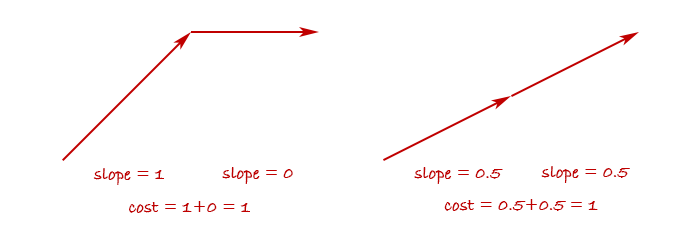
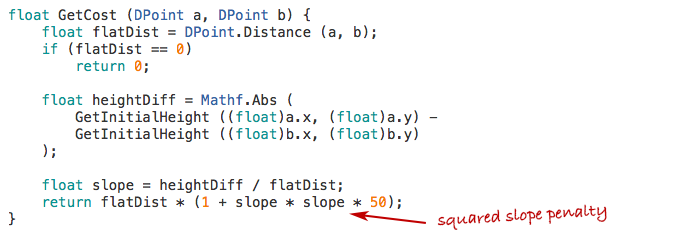
So in fact, my cost function wasn’t trying to avoid steepness - rather it was trying to make a path where the altitude changes monotonically. It would do everything it could to avoid the path first going up and then down again.
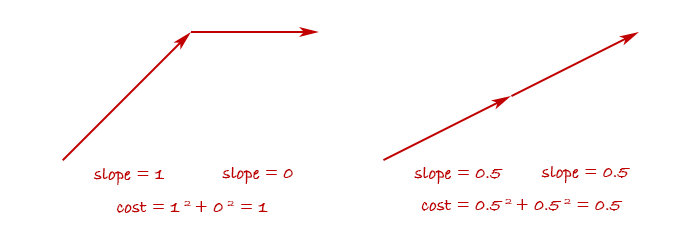
But I didn’t care if the path went a little up and down, as long as it wasn’t too steep at any point. To achieve this behavior, I needed to penalize steep slopes more than linearly, for example by squaring it.
This has the effect of penalizing abrupt changes in altitude and reward gradual changes.
And sure enough, after the change the generated paths avoided steepness and looked much more like what humans would create.

Tweaking pathfinding cost functions is one of those odd little things that I really enjoy. Seeing a little change in a formula imbue a generated creation with what could be mistaken for human design is really fascinating and fun!
Further notes
The observation-turned-blog-post in its original form ended there, but I've compiled some further notes for those who want to dig into the details.
Pathfinding method
Let me tell about the method I use for the pathfinding, since I was asked about this. I won't do an introduction to pathfinding in general here but assume understanding of the principles of performing pathfinding using an algorithm like A* or similar on a graph of nodes connected by edges.
Such a graph can be represented in many ways. Sometimes it's a data structure with explicit data representing all the nodes and edges and how they're connected. Other times it can just be a grid (like a 2D array) and each cell is implicitly connected to the neighboring cells - maybe the 4 or 8 neighbors, depending on whether diagonal connections are used.
It doesn't really matter, and a pathfinding algorithm can typically easily be modified to work with one or the other. Apart from giving it a start node and goal node, the important part is that you can tell the algorithm:
- Which other nodes are a node connected to?
- What is the real or estimated cost of getting from one node to another?
You might have data for this stored in advance or you might calculate the answers on the fly when asked.
For the terrain pathfinding I do the latter. In fact, there is neither an explicit graph, nor any 2D array. There is no data structure at all for the pathfinding to happen inside. Instead, it's all implicit, based solely on coordinates. I tell the pathfinder what the start and end coordinates are, and there's a function for getting "neighbor coordinates" to a given coordinate. There's also a function for getting the cost of getting from one coordinate to another, as you saw earlier.
This may sound completely free-form and magical at first, but there still is a structure that must be adhered to. You must imagine a grid structure and ensure the coordinates always fall within this grid. In my case it's a plain quadratic cell grid where each cell has a size of 5. So the start coordinate, goal coordinate, and every provided neighbor coordinate must always have x and y values that are multiples of 5. You also shouldn't use floating-point numbers for this, since they can produce floating point precision errors, and even the slightest imprecision can cause the pathfinding to completely fail.
I wanted my paths to be able to have a natural, non-jagged look, so I wanted edges to come in 16 directions instead of the basic 8. The 8 additional directions are achieved by going two cells out and one to the side. This provided me with an interesting choice of whether the 8 other directions should also go two cells out, or just one.

In theory the second option can be weird, since if you need to move just one cell the path have to first side-step by two cells. But in practice both seems to work fine. The first images in this post were made with the first option but I later decided to use the second to avoid the path having very small-scale zig-zags.
Effects of different parameter values
I got asked on the proceduralgeneration sub-reddit:
How rapidly does the path change as you increase the power from 1.0 to 2.0? What happens if you go past 2.0? Does the path eventually have to spiral around the mountain or something?
I had actually been content just using the values I had found which seemed to work well enough, but now that I'd been asked, of course I wanted to find the answers too! I tried doing the pathfinding with the power values 1.5, 2.0 and 3.0 and with the multiplier values 1, 2, 3, 4, 5, 6, 7, 10, 15, 20, and 25. I had moved the multiplier inside the power function since the original version of the code, so those multipliers are multiplied onto the steepness before the resulting value is raised to the given power. Here's a table of the results.

Some notes on the result.
Overall the common theme is that the results range from straight and boring to wildly tortuous. At the extreme end, the path begins to create loops - something that should be impossible with path-finding. However, the edges I use in the path-finding can cross each other. This means that they can appear to loop even though they never pass through the same points from the perspective of the path-finding. They only begin to do this once the path-finding is so extremely sensitive to tiny changes in altitude that the small difference in altitude between one of two crossing edges is enough for it to exploit it to loop around. I should say that I only sample the altitude at the end-points of each edge, which appears to be fully sufficient except in the extreme cases like this.
Note that there are very similar occurrences across the different power values. For example, multiplier 10 at power 1.5 looks just like multiplier 6 at power 3.0, and multiplier 7 at power 2.0 looks just like multiplier 5 at power 3.0. Does this mean that any result you can get with one power value, you can also get with another? That there exists a transformation that means they're mathematically equivalent? No, I don't believe so. It feels like there's subtle differences. For example, the progression of paths with power value 3 begins to do loops before it begins to take a major detour, while for power value 2, the loops only start happening after it has begun doing a large detour. The differences are very subtle though and hard to put the finger on exactly.
One thing that's tempting to look for is qualitative differences, such as some paths doing many small zig-zags and others doing larger swoops. However, I think that's a red herring. The algorithms doesn't measure sharpness of turns or frequency of turns in any way and shouldn't be able to tell one from the other. I think that the seeming qualitative differences are thus up to unpredictable aspects of how the path-finding interacts with the terrain height function that sometimes just happen to produce one result or the other. To answer it in terms of the original question: If the terrain was perfectly conical, a path from the base to the top might equally well form a spiral, a zig-zag pattern, or any other combination of left-winding and right-winding sections.
My own pragmatic takeaway from this is that sticking with just a power value of 2 seems fine and I'd then use multiplier values between 3 and 15 depending on how straight or tortuous I want the path to be.
Perspectives
These generated paths were a proof-of-concept for a new project I'm working on and I'm sure I'll learn more as I go along. For example, already I'm learning some things about approaches for flattening the terrain around the paths which I may share at a later point when I'm a bit more sure of my findings. For now, I hope you found this useful!
2024 update: Code available
I've now released a framework called LayerProcGen as open source, and one of the sample scenes generates natural paths using the technique described in this article. So a fully functional implementation is now available for study and use.
The Cluster 2015 Retrospective
The Cluster is an exploration game I've been developing in my spare time for some time. You can see all posts about it here. It looks like I didn't write any posts about it for all of 2015, yet I've been far from idle.
By the end of 2014 I had done some ground work for fleshing out the structure of the world regions, but the game still didn't provide visible purpose and direction for the player.
My goal for 2015 was to get The Cluster in a state where it worked as a real game and I could hand it over to people to play it without needing instructions from me. Did The Cluster reach this goal in 2015? Yes and no.

I made a big to-do list with all the items needed to be done for this to work. (As always, the list was revised continuously.) I did manage to implement all these things so that the game in theory should be meaningfully playable. I consider that in itself a success and big milestone.
However, I performed a few play tests in the fall, and it revealed some issues. This was not really unexpected. I've developed games and play tested them before, and it always reveals issues and shows that things that were designed to be clearly understandable are not necessarily so. I don't consider this a failure as such - when I decided on my goal for 2015 I didn't make room for extensive iteration based on play test findings. I did manage to address some of the issues already - others will need to be addressed in 2016.
On the plus side, several players I had playing the game had a good time with it once they got into it with a little bit of help from me. In two instances they continued playing for much longer than I would have expected, and in one instance a play-tester completed clearing an entire region, which takes several hours. I think only a minority of players can get that engaged with the game in its current state, but it was still highly encouraging to see.
Essentials
Some boring but important stuff just had to be done. A main menu. A pause menu. Fading to black during loading and showing a progress bar. (I found out that estimating progress for procedural generation can be surprisingly tricky and involved. I now have a lot more understanding for unreliable progress bars in general.) Also, upgrading to Unity 5 and fixing some shaders etc.

Enemy combat
I had AI path-finding working long ago, but never wrapped up the AIs into fully functional enemies. In 2015 I implemented enemy bases in the world to give the enemies a place to spawn from and patrol around.

Enemy combat also entailed implementing health systems for player and enemies (with time-based healing for the player), implementing player death and reloading of state, and having the enemies be destroyed when the player enters certain safe zones.
For the combat I decided to return to a combat approach I used long ago where both player and enemies can hold only one piece of ammo at a time (a firestone). Once thrown, player or enemies have to look for a new firestone to pick up before they can attack again. This facilitates a gameplay alternating between attacking and evading. I noticed that the game Feist uses a similar approach (though the old version of my game that used this approach is much older than Feist).

I decided to begin to use behaviour trees for the high-level control of enemies. This included patrolling between points by default, spotting the player on sight, pursuing the player, but look for firestones on the ground to use as ammo if not already carrying one. Then returning to patrolling if having lost sight of the player for too long. Even AI logic as simple as this turned out to have quite some complexities and edge cases to handle.
Conveying the world structure
The other big task on my list after enemy combat was making the world structure comprehensible and functional to the player.
Worlds in The Cluster are divided into large regions. One region has a central village and multiple shrines. All of those function as safe zones that instantly destroys enemies when entered and saves the progress. In addition, a region has multiple artefact locations that are initially unknown and must be found and activated by the player. This basic structure was already in place by the end of 2014, but not yet communicated to the player in any way.
I've done my share of game design but I'm still not super experienced as a game designer. It took a lot of pondering and iteration to figure out how to effectively communicate everything that's needed to the player, and even then it's still far from perfect. In the end I've used several different ways to communicate the world structure that work in conjunction:
- Supporting it through the game mechanics.
- In-world as part of how the world looks.
- In meta communication, such as a map screen.
- Through text explanations / dialogue.
Supporting world structure through game mechanics
There are a number of game mechanics that are designed to support the world structure.
The artefacts that are hidden around the region can be discovered by chance by exploring randomly, but this can take quite a while and requires self-direction and determination that not all players have. To provide more of a direction, I introduced a mechanic that the shrines can reveal the approximate location of the nearest undiscovered artefact. This gives the player a smaller area to go towards and then search within.

In order to sustain most of the mystery for as long as possible, a new approximate artefact location can't be revealed until the existing one has been found. This also helps giving the player a single clear goal, they are still free to explore elsewhere if desired.
Once an artefact is found, a shortcut in the form of a travel tube can be used to quickly get back to a more central place in the region. Initially the tube exit would be close to a shrine, but the player might subsequently miss the shrine and be aimless about where to go next. Based on early play tests, I changed the tubes to lead directly back to a shrine. This way the player can immediately choose to have a new approximate artefact location revealed.

World structure communicated in-world
I got the idea to create in-world road signs that point towards nearby locations in the region, such as the village and the various shrines. This both concretely provides directions for the player and increases immersion.
Particularly for a procedurally generated world, the signage can also help reinforce the notion that there is structure and reason to the world as opposed to it being entirely random as can be a preconception about procedurally generated worlds.

This entailed generating names for the locations and figuring out which structures to store them in. The signs can point to locations which are far outside the range of the world that is currently loaded at the max planning level. As such, the names of locations need to be generated as part of the overall region planning rather than as part of the more detailed but shorter range planning of individual places.
Next, I needed to make key locations look their part. I'm not a modeller, but I created some simple placeholder models and structures which at least can give the idea of a village and shrines.


Improved map screen
I had created a detailed map for the game long ago, but that didn't effectively communicate the larger overall structure of a region.
To remedy this I created a new map that shows the region structure. I've gone a bit back and forth between how the two maps integrate, but eventually I've concluded that combining them in one view produces too much confusing simultaneous information, so they are now mostly separate, with the map screen transitioning between the two as the player zooms in or out.
Here's examples of the detail-map and the region-map:


Apart from the map itself, I also added icons to the map to indicate the various locations as well as the position of the player. Certain locations in the game can be known but not yet discovered. This mean the approximate location is known but not the exact position. These locations are marked with a question-mark in the icon and a dotted circle around it to indicate the area in which to search for the location.

Part of the work was also to keep track of discovered locations in the save system.
Dialogue system
Communicating structure and purpose through in-world signage and the map screen was not sufficient, so I started implementing a dialogue system in order to let characters in the game be able to explain things.

This too proved to be quite involved. Besides the system to just display text on screen in a nice way, there also needed to be a whole supporting system for controlling which dialogues should be shown where, depending on which kind of world state.
This can be complex enough for a manually designed game. For a procedural game, it's an additional concern how to design the code to place one-off dialogue triggers in among procedural algorithms that are used to generate hundreds of different places, without the code becoming cluttered in undesirable ways.
What's next?
I hope to get The Cluster into a state where it's fully playable without any instructions in the first quarter of 2016.
After that I want to expand on the gameplay to make it more engaging and more varied.
As part of that I anticipate that I may need to revert the graphics in the game to a simpler look for a while. I've had a certain satisfaction from developing the gameplay and graphics of the game in parallel, since having something nice to look at is very satisfying to accomplish. However, now that I'll need to ramp up rapid development of more gameplay elements, having to make new gameplay gizmos match the same level of graphics will slow down the iteration process. For that reason I'll probably make the game have more of a prototype look for a while, where I can develop new gameplay with little or no time spent on graphics and looks.
Nevertheless, even with a much simpler look, I still want to retain some level of atmosphere, since one of the things I want to implement is more variety in moods. This is in extension to the game jam project A Study in Composition I worked on this year.
If you are interested in being a play tester for early builds of The Cluster, let me know. I can't say when I will start the next round of play testing, but I'm building up a list of people I can contact once the time is right. Play testing may involve talking and screen-sharing over e.g. Skype since I'll need to be able to observe the play session.
If you want to follow the development of the Cluster you can follow The Cluster on Twitter or follow myself.